Technical support and consultation: Mr. Zhou, engineer at Stak.
It is 3 p.m. The cutter on your line was perfect this morning. Now the collar stand from the top of a bundle fits the master pattern, but the one from the bottom of the same bundle has its shoulder notch sitting closer to the front. The vacuum gauge reads lower than usual, and the knife sounds rough on every corner. Nobody changed the marker file. Something between the first ply and the last has changed — and very often, that something is a worn part.
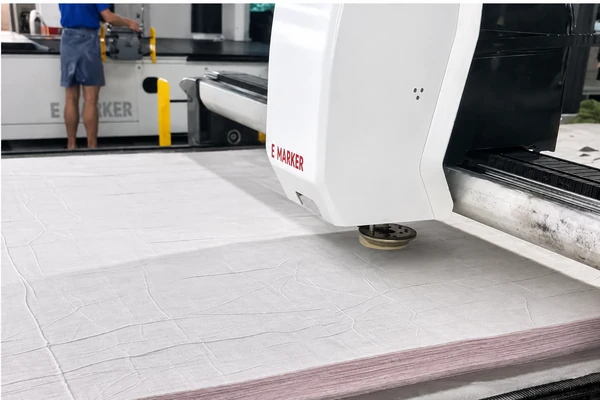
An automatic fabric cutting machine is a computer-controlled table that holds a compressed stack of fabric under vacuum and cuts it with a fast up-and-down knife. Its precision depends on a small group of wear parts — blade, guides, sharpening stone, presser foot, bristle bed, belts and bearings — that slowly lose shape with every hour of cutting.
I sell compatible spare parts for these machines every day at Stak (Shanghai Stak Enterprise Co., Ltd, the company behind icutterpart.com), and most of the questions I get are really two questions: "How does this part work?" and "Why did it die so fast?" This pillar guide answers both. I walk you through the whole cutting process end to end, then go part by part through what wears out, why it wears, what it looks like on the cutter and what to order. I also cover, briefly, how to "read" a bad cut before you buy anything and what to check on a used cutter, and how to send a parts inquiry that gets the right answer the first time.
This guide covers multi-ply (high-ply) cutters. If you run a Lectra Vector, Gerber Paragon, Gerber Atria, Gerber GTXL, Gerber XLC7000 or Gerber Z7, Bullmer D8002, Bullmer Procut or Bullmer R 90 PRO, Eastman Talon, FK Group, Kuris, Yin, Morgan Tecnica or OROX cutter, the logic is the same — only the part numbers change.
Key Takeaways
- A multi-ply cutter is a chain: marker file → spread → vacuum + plastic film on a bristle bed → reciprocating knife on a moving gantry → automatic sharpening → bite feeding. A fault in any link shows up as a bad cut.
- The fastest-wearing parts are the blade, sharpening stone or belt, blade guides and rollers, presser foot and bristle blocks. Next come timing belts, bearings, bushings, the knife-drive crank parts and vacuum filters.
- Keep the top, middle and bottom pieces from the same cut. Comparing them tells you more than one photo of a frayed edge, and usually points to one assembly instead of the whole head.
- Replace by signals and running hours, not by the calendar alone. Hour-based kits such as Lectra 500H / 1000H / 2000H / 4000H maintenance kits make planning easier.
- Plan the blade, belt and stone together. One sharpening stone or wheel covers about 6–12 blades, and on belt sharpeners each blade uses about 2–4 belts. Change the blade steel or the ply height and both intervals change with it.
- Order by part number + exact machine model + photos of both working and mounting sides + quantity + ship-to country. Two blades can measure the same and still be different parts.
What Is an Automatic Fabric Cutting Machine?
An automatic fabric cutting machine is a CNC cutting table for soft materials. It reads a digital marker, holds the fabric flat with vacuum, and drives a cutting tool along every pattern line. Multi-ply models cut a compressed stack of many layers at once; single-ply models cut one or a few layers with more detail.
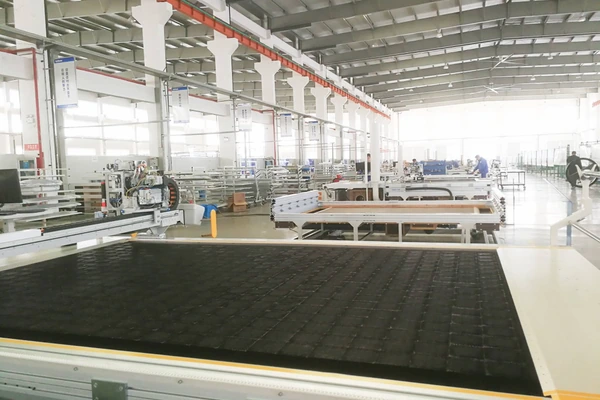
At heart, the machine belongs to the numerical control (CNC) family. A gantry (also called the beam or bridge) moves along the length of the table on the X axis. A carriage moves across the beam on the Y axis. The cutting head rides on that carriage, so the two axes together can put the knife at any point on the table. A research paper comparing automatic and straight-knife cutting in garment factories describes the same layout — a cutting device in a carriage on a crossbar, a vacuum table that holds the material, and an impermeable plastic cover for porous fabric (Zenodo, "Comparative Study on Automatic Fabric Cutting Machine and Straight Knife Cutting Machine").
The operator spreads fabric into a stack — the lay — covers it with thin plastic film, and the cutter follows the marker file piece by piece. Nobody follows a paper pattern by hand. Two words are worth getting right from the start: a ply is one layer, and the lay is the whole stack.
How does it compare with other cutting methods?
| Method | Typical use | Strength | Limitation |
|---|---|---|---|
| Manual straight-knife or round-knife cutter | Small shops, short runs | Low investment | Accuracy depends on the operator; slow for volume |
| Automatic multi-ply knife cutter | Volume apparel, automotive and furniture production | Repeatable accuracy through a full stack | Higher investment; needs consumables and regular maintenance |
| Single-ply / low-ply cutter | Samples, small batches, leather, technical sheets | Detail and tool flexibility | Lower throughput per pass |
| Laser cutter | Single layers, synthetics, fine detail | No blade wear; sealed edges on synthetics | Not used for thick multi-ply lays; edges can scorch on natural fibres |
Multi-ply vs single-ply in one minute
I wrote a full comparison in multi-ply vs single-ply automatic cutting machines, so here is the short version.
| Point | Multi-ply (multi-layer) cutter | Single-ply / low-ply cutter |
|---|---|---|
| Knife | Long reciprocating (oscillating) knife | Shorter oscillating knife, drag knife or wheel |
| Hold-down | Strong vacuum + plastic overlay film | Vacuum, often lower |
| Main wear items | Blades, sharpening stones, blade guides, bristle blocks, presser foot, timing belts | Blades, cutting mat or felt belt, tool holders |
| Example models | Lectra Vector iX and Lectra Vector iQ; Gerber Paragon, Gerber Atria, Gerber GTXL, Gerber XLC7000, Gerber Z7; Bullmer D8002, Bullmer Procut, Bullmer R 90 PRO; Eastman Talon; FK Group; Kuris; Morgan Tecnica | Zünd and similar single-ply flatbed cutters |
Published numbers show why stack height matters so much. Lectra says its Vector Fashion iX2 and Q2 low-ply range cuts at a ply height of less than 2.5 cm (Lectra). Eastman rates its Talon 25 for up to 3 cm and its Talon 75 for up to 7 cm of compressed material (Eastman Talon). Bullmer lists the Procut D 8001 S at up to 80 mm maximum cutting height, depending on material (Bullmer Procut brochure, PDF). A taller lay means a longer knife working through more fabric, with more heat, more side force and more lint — and that is the main reason multi-ply cutters eat parts faster.
Who makes multi-ply cutters?
The brand you own decides which part numbers you look for.
- Lectra (France) — the Vector range. Lectra positions Vector Fashion Q2 and iX2 for small-quantity orders, the iQ50 and iQ80 for repetitive manufacturing, and the iX6 and iX9 for high-volume production; denim, lingerie and footwear versions also exist (Lectra Vector Fashion).
- Gerber (now part of Lectra) — Gerber Paragon, Gerber Atria and older lines such as Gerber GTXL, GT7250, GT3250, GT1000, XLC7000, Z7 and the S-series. Lectra completed its acquisition of Gerber Technology on June 1, 2021 (Lectra press release, PDF), so Gerber cutters are now sold on Lectra's site, but Gerber part numbers still follow their own pattern. Many older Gerber machines are still cutting every day, so parts for discontinued models stay in demand.
- Bullmer (Germany) — Bullmer D8002, Bullmer Procut and the Bullmer R 90 PRO high-ply cutter, which Bullmer lists with continuous "cutting while advancing" (Bullmer R 90 PRO).
- Eastman (USA) — Eastman Talon multi-ply cutters and older Eastman MPC models.
- FK Group and Morgan Tecnica (Italy), Kuris (Germany), plus Asian makers such as Yin. Whatever the brand, the working principle and the list of wear parts are very similar.
Each brand has its own spare-part "language" — I explain the patterns in how to find your automatic cutter part number. If you are choosing a machine rather than fixing one, my comparison of Lectra vs Bullmer is a good next read.
How Does a Multi-Ply Cutter Work, Step by Step?
A multi-ply cutter works in a fixed chain: the CAD marker is nested, fabric is spread into a lay, the lay moves onto a bristle bed, vacuum compresses it under plastic film, the reciprocating knife cuts every piece, the knife is resharpened, and the conveyor bites forward to the next window.
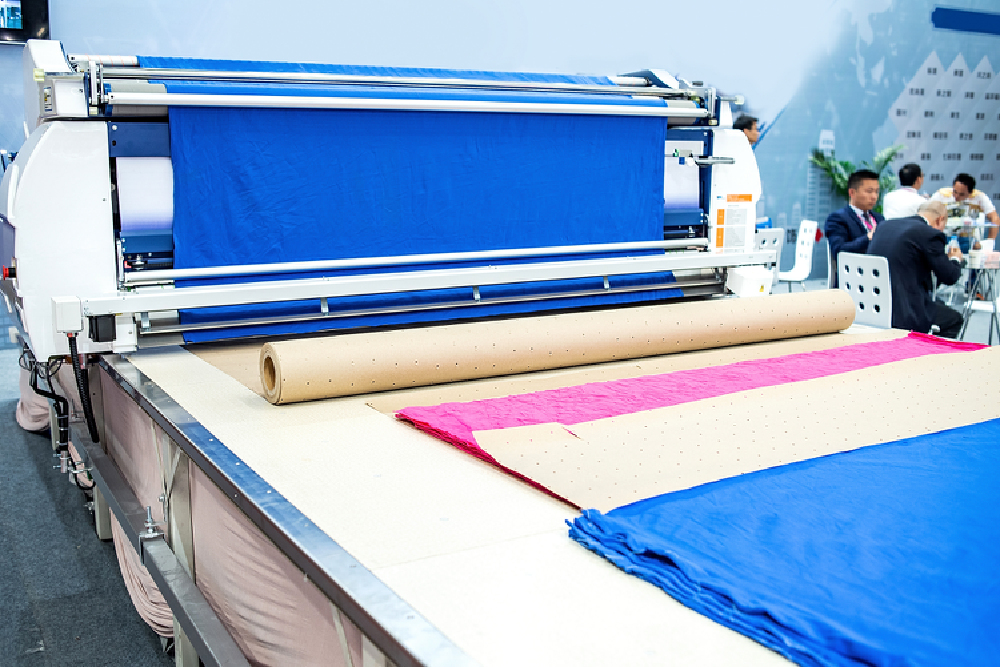
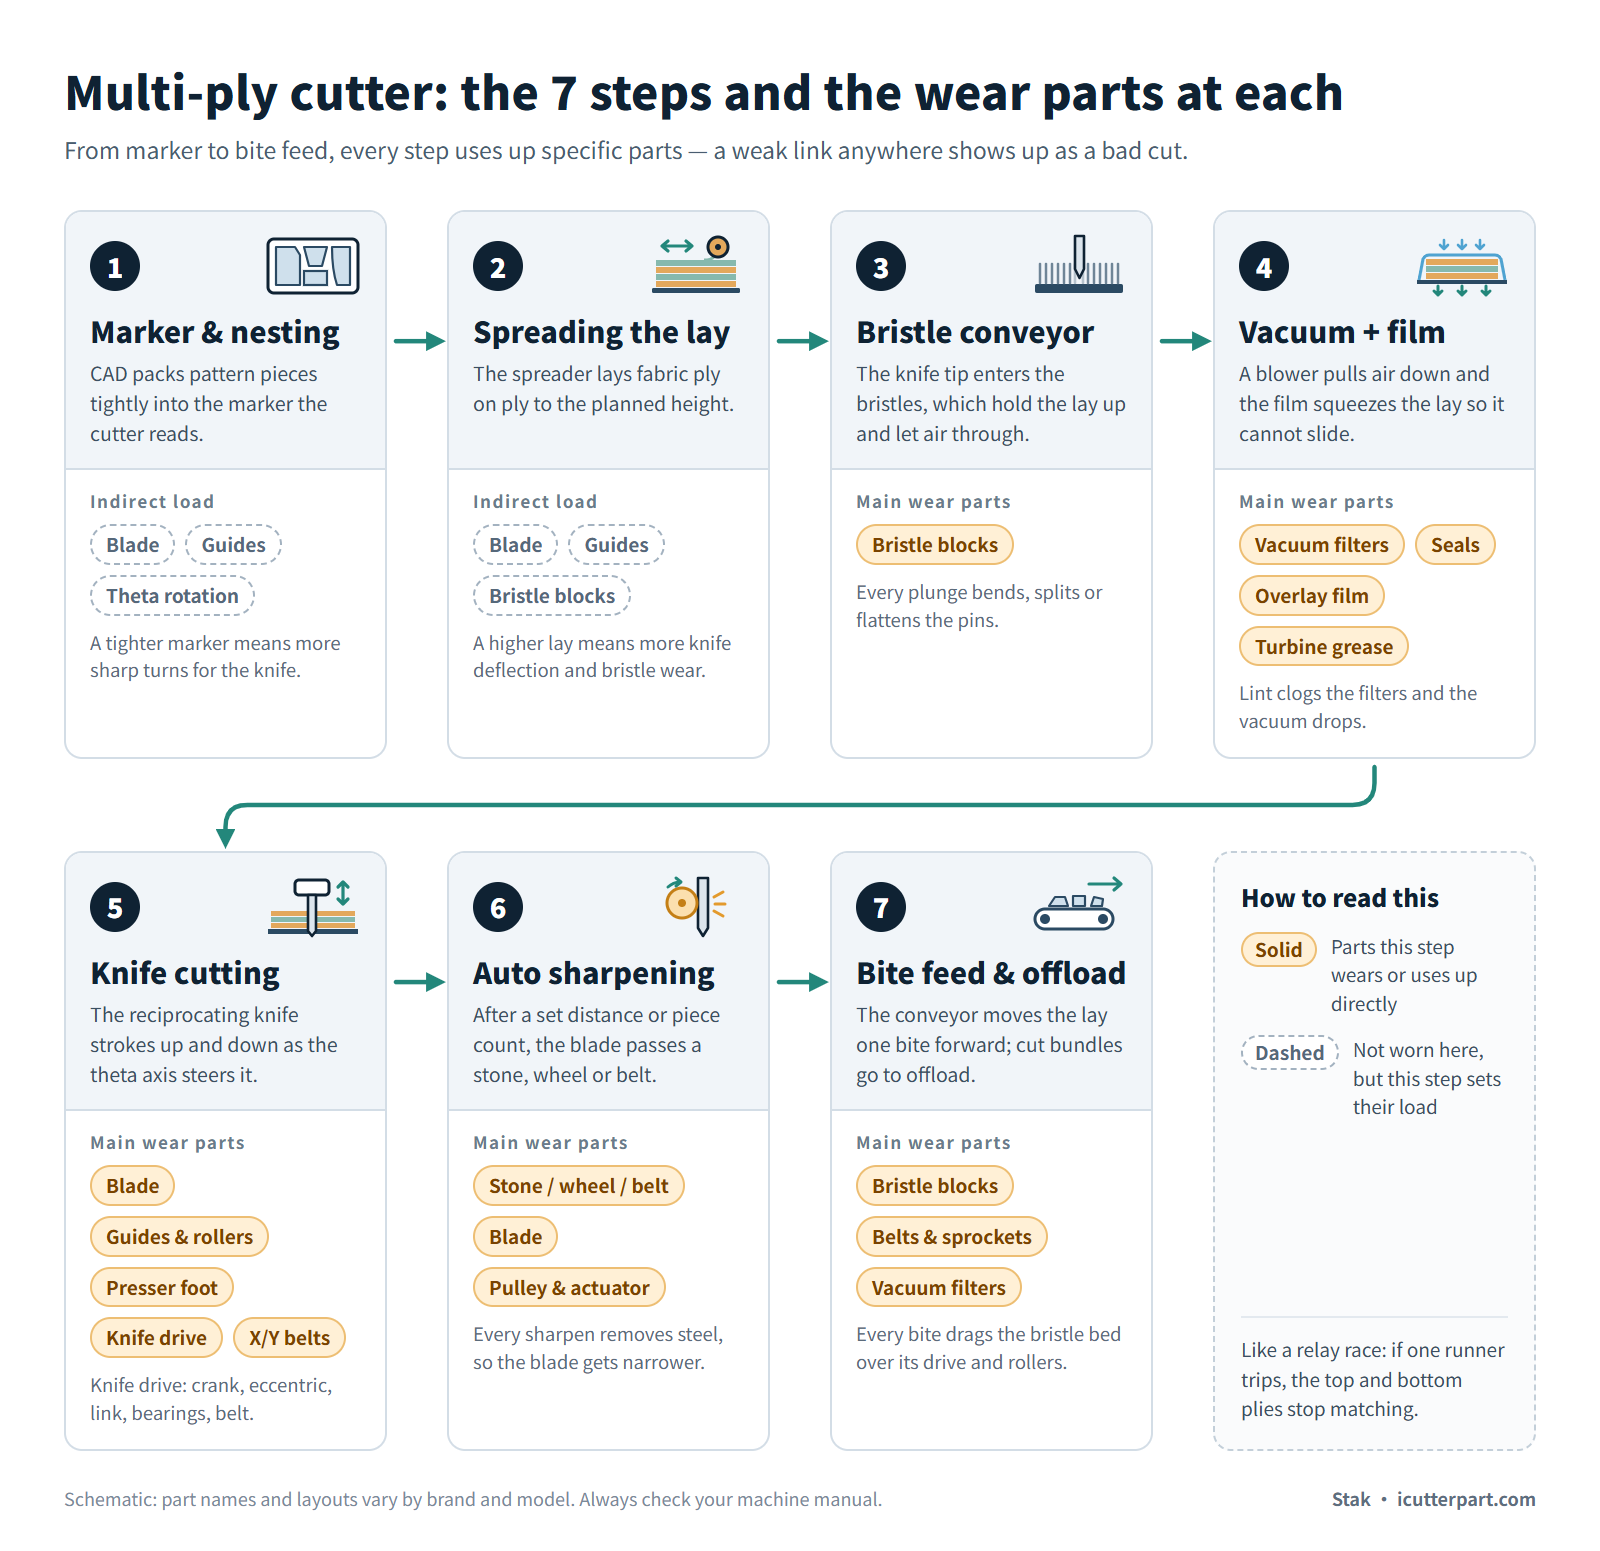
Think of it like a relay race. Every runner (step) passes the fabric to the next one. If one runner trips, the finish line — clean, identical pieces from top ply to bottom ply — is lost.
Step 1: Marker making and nesting
Everything starts in CAD. Pattern pieces are packed into a long rectangle called a marker, like puzzle pieces, so as little fabric as possible is wasted. This packing problem is called nesting. Grain direction, matched pairs, nap and one-way prints all limit how pieces can be placed. The cutter reads the file through computer-aided manufacturing (CAM) software on its control PC.
The marker also carries the small marks sewing depends on, and each one has a different job on the cloth:
| Mark | What must be right | Typical failure to record |
|---|---|---|
| Slit notch | Position along the edge + depth into the seam allowance | Too shallow on lower plies, or full depth but in the wrong place |
| V-notch | Position + two flanks meeting at the right point | Flanks not meeting, rounded tip |
| Drill mark (if the head has a drill) | Centre position carried through the whole stack | Hole drifts on lower plies, hole closes up on synthetics |
A simple test saves a lot of money: if a notch is off by the same amount on every ply, open the actual file sent to the cutter and compare it with the approved pattern. A blade change cannot move a point that was exported in the wrong place.
Wear link: a tight marker puts pieces very close together. That means more sharp corners and more knife turns, which load the blade, the guides and the knife rotation harder.
Step 2: Spreading the lay
A spreading machine lays fabric back and forth, ply on ply, to the planned height. Good spreading is flat, without tension and with edges aligned; modern spreaders handle this with features such as lateral alignment and controlled tension (Audaces Premium spreader). A badly spread lay — stretched, bowed or wavy — will never cut true, no matter how new the knife is. For every lay, record both the ply count and the compressed lay height: 36 plies of shirting and 36 plies of foam-backed seat cloth are completely different jobs for a knife.
Step 3: Moving onto the bristle conveyor
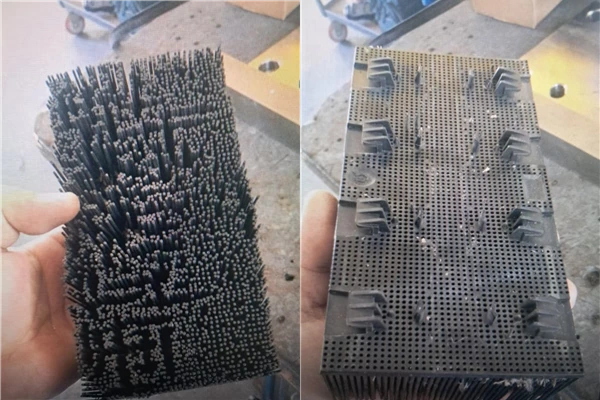
On most modern multi-ply tables, the cutting surface is a conveyor made of thousands of bristle blocks — plastic "brushes" with thousands of pins on top. The knife tip plunges through the last ply and into the bristles. The pins let the blade pass and also hold the fabric up; the spaces between them give the air a path. Without them the knife tip would hit a hard deck and the cut could not be finished. Some processes also use a perforated paper underlay beneath the bottom ply to help move the lay while still letting air through. I go much deeper in my bristle blocks guide.
Step 4: Vacuum and plastic overlay film
A vacuum turbine (blower) under the table pulls air down through the bristles. The lay is covered with thin plastic film, so the air pulls the film down and squeezes the stack tight — like vacuum-packing coffee. A compressed lay is much shorter than a loose one, and it cannot slide while the knife pushes it. Gerber's consumables sheet says its barrier strips maintain high vacuum "by controlling the area of suction while cutting" (Gerber Technology service consumables, PDF). The Paragon manual lists separate vacuum levels for biting, cutting, continuous cutting and idle, with low-vacuum warnings and alarms (Gerber Paragon documentation, PDF).
Hold-down also weakens during a marker, because every finished outline opens a new air path. That is why some machines use a resealer, which lays fresh film over areas that have already been cut; Gerber's Atria documentation says the optional active resealer "greatly minimizes vacuum loss" (Gerber Atria user documentation, PDF).
Step 5: Cutting with a reciprocating knife
The cutting head lowers its presser foot onto the lay, plunges the knife and starts moving. The gantry and carriage position the head on X and Y, and a third axis — often called theta or the C axis — turns the blade so its edge follows the contour. Once plunged, a length of the knife edge spans the whole lay, and short vertical strokes slice the yarns as the head moves forward. That is why knife stroke length and maximum compressed cutting height are two different specifications.
At a sharp corner, the head has to slow down and turn in a very short distance; some programs lift the knife, turn it and plunge again. Drills punch marking holes and notchers make small V or I notches for sewing.
Step 6: Sharpening on the fly
After a set amount of cutting, the head runs the blade past a sharpening stone, grinding wheel or abrasive belt. On Gerber Paragon, the manual says the knife "is sharpened automatically based on parameter settings for the number of pieces cut and the amount of cutting performed" (Paragon documentation). Bullmer describes the Procut grinding unit as using "self-adjusting grinding wheels" (Bullmer Procut D 8001 S). I explain the sharpening details in the cutting-head section below.
Step 7: Bite feeding and offloading
A cutting window is shorter than a full marker. When the window is finished, the conveyor moves the lay forward by one "bite", and the head cuts the next window. A contour that crosses that boundary has to resume at exactly the same physical point on the cloth. Advanced machines even cut while the conveyor moves — Lectra calls its version Eclipse (Lectra Vector Fashion iX2 and Q2) and Bullmer lists "cutting while advancing" on the R 90 PRO. Cut bundles travel to the offload end, where operators pick, label and bundle them.
Wear link: every bite drags the bristle bed over its drive and rollers, and every vacuum cycle pulls lint into the filters. A conveyor that bites all day wears its belts, sprockets and bristles very differently from a static table.
What Is Inside the Cutting Head?
The cutting head turns motor rotation into a fast vertical knife stroke through a crank or eccentric, keeps the blade straight with guides and rollers, presses the lay with a presser foot, rotates the knife on a theta axis, sharpens it automatically, and on many machines senses blade bending or edge wear to correct it in real time.
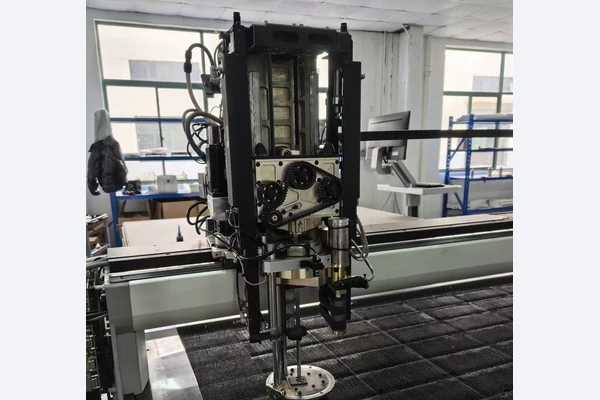
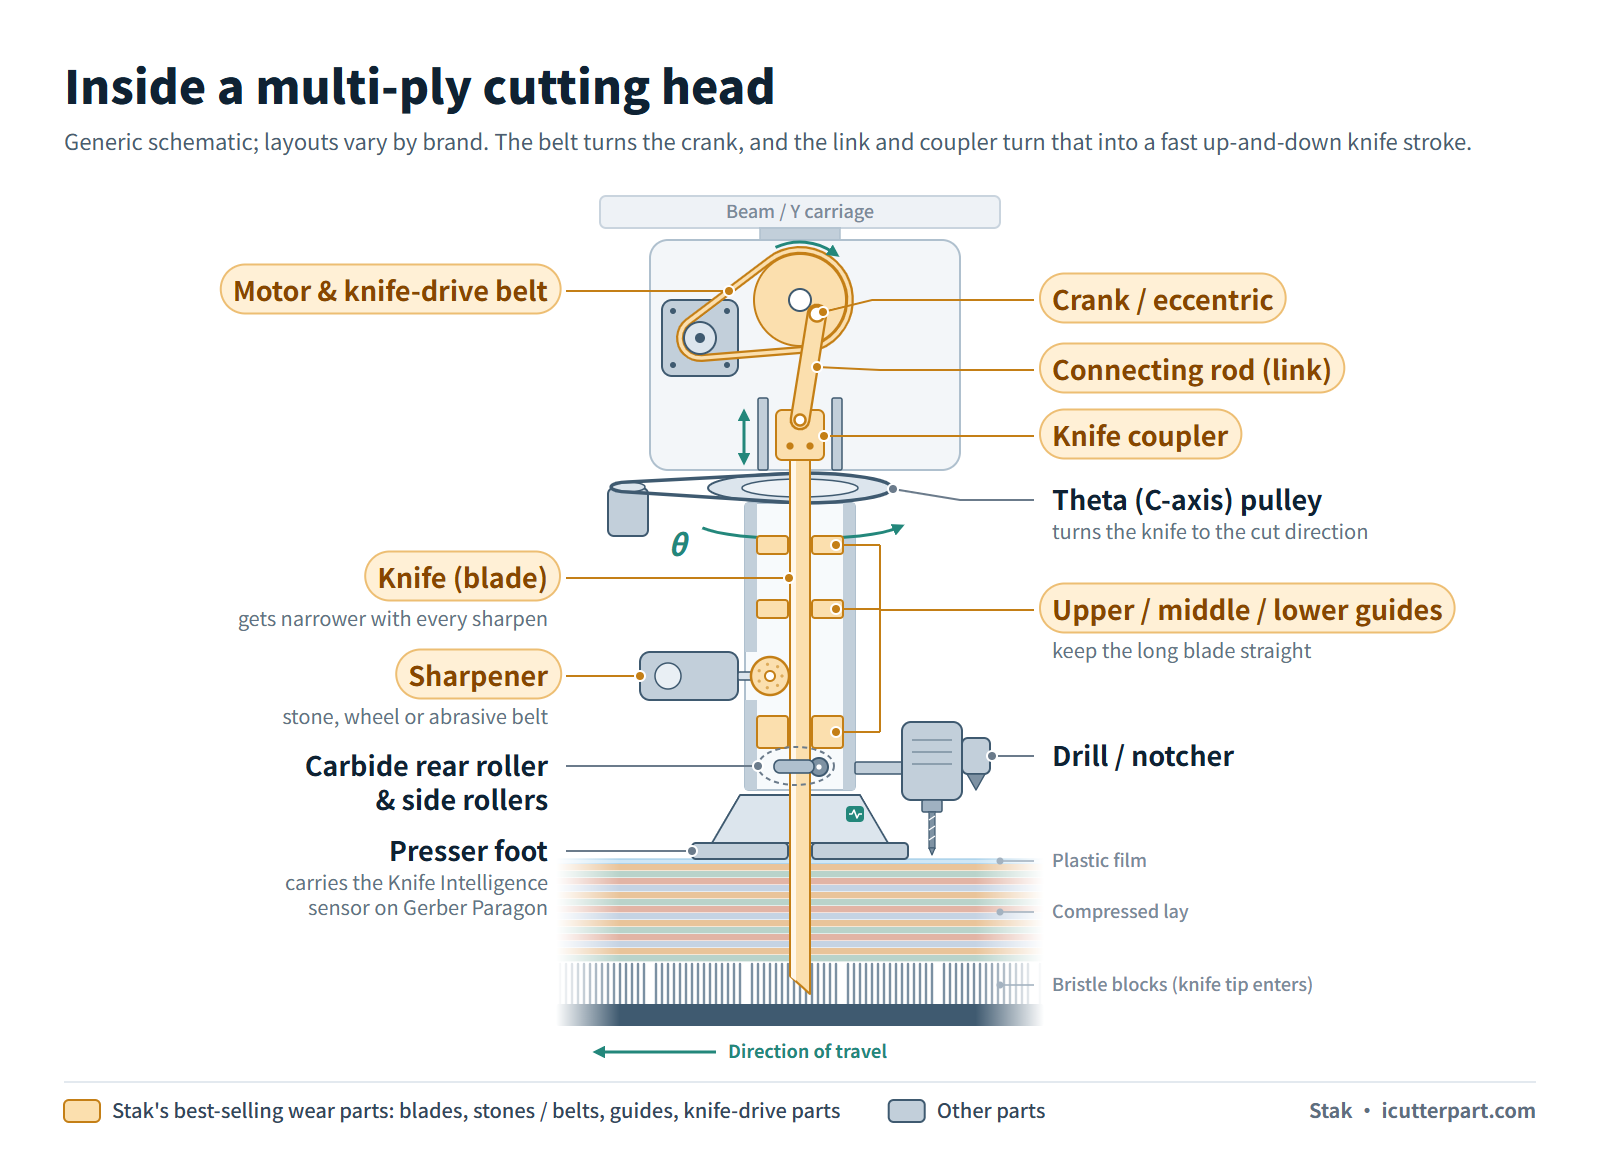
If the bed is the "floor" of the cutter, the head is its "hand". It is also where most of your spare-part budget goes.
Knife drive: crank, eccentric, coupler and bearings
A motor spins a shaft. A crankpin or eccentric crankshaft on that shaft pushes a connecting rod (or "link"), and the rod pushes the knife up and down through a coupler — just like a bicycle pedal turning into leg movement. Eastman's MPC 5000 service manual, for example, shows the knife held in a coupler that is driven by a blade link through upper, middle and lower knife guides (Eastman MPC 5000 service manual, PDF). The knife makes many strokes every second, so these small parts work harder than almost anything else on the machine. That is why crankpins, bushings and small ball bearings need oil or grease and appear in almost every maintenance kit. Bullmer uses automatic oil dosing that depends on knife frequency (Bullmer); Eastman lists an internal crank cooling system on the Talon 25x to reduce heat and wear (Eastman Talon 25x brochure, PDF).
On Gerber machines the knife drive often runs on a toothed belt, such as the 75-tooth knife-drive timing belt 180500077. Other typical Stak listings here include the Lectra bushing, crankpin and screw kit 702866, the Bullmer D8002 knife drive assembly 510162 / 105901 and knife drive lubricating oil 063067.
Blade guides and rollers
A long, thin knife wants to bend. Guides and rollers hold it straight above and inside the stack. Lectra heads use parts such as the blade guide 130905, the knife fixing blade guide 129398, the carbide rear blade roller 703379 and side guide rollers 775491; Bullmer D8002 uses a lower knife guide 114555. The blade rubs on these parts with every stroke, so they are true consumables.
Presser foot and hold-down
The presser foot sits around the knife and presses the top of the lay, so the fabric does not lift as the blade rises. On Gerber Paragon, the presser foot bowl also carries the sensor for Knife Intelligence (see below). Stak lists, for example, the Lectra Vector presser foot assembly 707169, the bronze roller presser foot assembly 705935 and the Bullmer cutting-head holding-down device 115480.
Knife Intelligence and blade deflection
When a knife cuts a curve through a high lay, the fabric pushes it sideways and the blade bends. The lower part of the edge then takes a slightly different path from the upper part, so the bottom ply gets a different shape. This is knife deflection: a clean top corner with a rounded bottom corner is the classic sign.
Gerber's Paragon manual explains that Knife Intelligence uses "a sensor in the presser foot bowl" to measure lateral stress and "turns the knife in the direction of the force until there is a balance of lateral pressure", and states that it "becomes a requirement as ply heights increase above 3 cm of compressed material" (Paragon documentation). The Gerber Z7 brochure describes Knife IntelligencePlus algorithms that "predict, sense, and correct knife deflection during the cutting process" (Gerber Z7 brochure, PDF), and Bullmer's Polish distributor mentions a similar "intelligent knife" system on the Bullmer Procut (Bullmer Poland).
The key point for maintenance: this correction only works if the mechanics are healthy. A worn guide, a loose roller or a dull blade gives the sensor a "noisy" signal, and the machine fights itself.
Theta (C-axis) rotation, drills and notchers
The theta axis turns the knife so it always faces the cutting direction. It uses small belts, pulleys and gears — for example the Lectra vibration pulley gear 128047. Drills and notchers have their own motors, such as the Bullmer drilling motor 70130886. Some heads use heated drills for synthetic fabrics; heat helps the hole stay clean, but it also adds one more part with a temperature limit.
Sharpening system: stones, wheels and belts
The sharpener is a small grinding station on the head. Across the machines Stak supplies, it uses one of two kinds of abrasive:
- Sharpening stones or grinding wheels — used on most multi-ply cutters, including Gerber, Lectra and Bullmer. Examples: the Gerber 80-grit grinding wheel 20505000 (listed for S-91 / S-93-7 / S7200), the Gerber Paragon vitrified grinding stone 99413000, the Gerber Paragon HX / LX magnetic swirl grinding wheel 1011067000, the Lectra Vector 5000/7000 grinding wheel 703410 and the Bullmer diamond grinding wheel B181 060588. Spacers and clamps are separate spare parts on most machines.
- Abrasive sharpening belts — used on some cutters instead of a stone. Morgan's NEXT 70 and NEXT 90, for example, take a STARCKE P100 belt measuring 260 × 19 mm, the 503-16-121 sharpening belt.
Sharpening does something people often forget: it moves the edge. Each cycle removes a little steel, so the fresh edge sits slightly further back toward the spine than when the blade was new. Gerber's Atria documentation explains that "as the knife is sharpened, the edge of the knife moves back", which used to make parts cut late in the day less accurate than parts cut with a new knife; Atria's knife-edge sensor measures the edge on each sharpen cycle so the software can adjust the cut path (Atria user documentation; see also Lectra Gerber Atria).
The same document describes two ways to trigger sharpening: by distance cut ("Sharpen Frequency") or every n pieces, which it says "may work well if parts are approximately the same size". That choice matters more than it looks. Here is an illustrative example with made-up settings: two markers each have 240 m of real knife-down cutting. Marker A has 60 large pieces; marker B has 360 small ones. With sharpening set to every 20 pieces, the machine sharpens 3 times on marker A (about one sharpen per 80 m) but 18 times on marker B (about one per 13 m). Same cutting distance, six times as much sharpening. So a new style with lots of small pieces can eat blades faster even when total cutting length has not changed.
My grinding and sharpening parts guide explains how to identify each abrasive type.
| Head subsystem | What it does | Typical wear parts to stock |
|---|---|---|
| Knife drive | Turns rotation into a vertical stroke | Crankpin, eccentric, link/connecting rod, coupler, bushings, small bearings, knife-drive belt, oil |
| Blade guidance | Keeps a long blade straight | Upper/middle/lower guides, carbide rollers, side rollers |
| Presser foot | Holds the top ply down; carries the Knife Intelligence sensor on Gerber Paragon | Foot plate, rollers, springs |
| Theta / C axis | Turns the knife to the cutting direction | Small timing belts, pulleys, gears |
| Sharpener | Keeps the edge sharp | Stone, wheel or belt; spacers; pulley; actuator cable |
| Drill / notcher | Makes marks for sewing | Drill bits, drill motor, notch blades |
Which Parts of an Automatic Cutter Wear Out First?
The parts that touch fabric or the blade wear first: cutting blades, sharpening stones and belts, blade guides and rollers, presser feet and bristle blocks. Moving parts under constant load — timing belts, bearings, bushings, linear guides and vacuum filters — wear next, more slowly but just as surely.
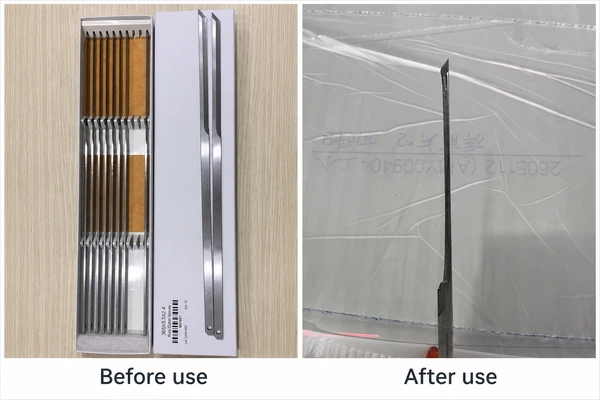
This is the heart of the guide. For each part I explain what it does, why it wears, how it looks when it is tired, and whether you should repair or replace.
Stak's view: Judging by the inquiries we receive every day, the parts customers buy most often are bristle blocks, cutting blades, sharpening stones and sharpening belts. Beyond those, we sell a lot of parts for the sharpener assembly and the knife-drive assembly. Both sit inside the cutting head and vibrate and work hard all day, so their small parts — especially belts, bearings and connecting links — also need replacing often.
1. Cutting blades (knives)
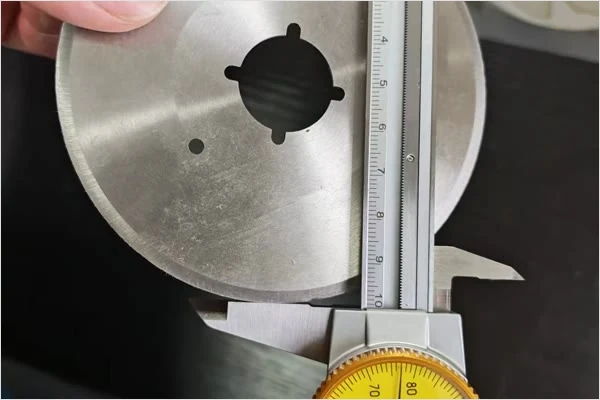
What it does: the blade is the only part that actually cuts. Each machine model takes its own length, width, thickness and mounting end. The Stak blades in the table below are listed as HSS M2 high-speed steel, which is enough for most garment fabrics (for denim, see Stak's view below), and the nominal sizes show how much they differ:
| Blade reference | Listed for | Nominal size L × W × T (mm) |
|---|---|---|
| 99913000 | Gerber Paragon HX | 255 × 7.9 × 1.95 |
| 21261011 | Gerber Paragon HX / VX, XLC7000, Z7, G7.2 | 255 × 8 × 2.35 |
| 1013522000 | Gerber Atria GT7 | 255 × 8 × 2.35 |
| 85878001 / 85878000 | Gerber GTXL / Paragon LX | 206 × 7.9 × 1.93 |
| 89301000 | Gerber GT1000 | 202 × 7.9 × 1.93 |
| 801559 / 709547 | Lectra Vector Q2 / iX2 | 90 × 5.5 × 1.5 |
Look at the second and third rows: same nominal size, different part numbers. I come back to that in the ordering section. Other listings include the Gerber XLC7000 blade 22941000, the Morgan blade 502-12-100 and the Yin blade 0720G6.
Why it wears: every stroke rubs the edge on fibres; every sharpening removes steel, so the blade gets narrower. The edge rounds, picks up deposits or gets a nick. Synthetics heat the edge; denim and coated fabrics are abrasive. Hitting a hard object (a pin, a clip or the bed) can chip or snap it.
Signs on the cutter: fuzzy or frayed edges, uncut yarns, more "pulling" on knits, louder cutting noise, more knife alarms, and curves that get worse between sharpens — especially on the bottom plies. Look for a chipped or rolled tip too; on denim, a blade body that runs hot enough to turn blue should come out before it snaps.
Replace or repair: a blade cannot be repaired. When it reaches the machine maker's discard limit, or bends or chips, it is scrap. Always keep spare blades in stock — the planning figures in the maintenance section show how many you will use. Browse compatible cutting blades or the blade category.
Stak's view: For ordinary garment fabrics an M2 high-speed steel blade is enough; for denim we usually recommend M35. M2 is a cobalt-free, general-purpose steel: it is very tough, resists vibration and chipping, and offers excellent value on cotton and ordinary wovens. M35 is a cobalt high-speed steel with better red hardness (hardness at high temperature) and wear resistance, so under high-speed reciprocating cutting the edge is less likely to soften from heat and go dull. It lasts longer on denim, heavy synthetics and coated fabrics, though it is slightly less tough than M2.
2. Sharpening stones, grinding wheels and sharpening belts
What it does: restores the edge many times per shift.
Why it wears: abrasive grains break off by design — that is how a grinding wheel stays sharp. Over time the stone gets smaller, wears unevenly, glazes with melted fibre, or grooves where the blade always touches; a belt glazes, wears through or tears. Lectra notes that Paragon uses "quick-change, long-life stones" and temperature sensors that "prevent fusing" (Lectra) — heat is the enemy here too.
Signs: a fresh sharpen gives little improvement; the blade goes dull soon after a blade change; a stone loaded with fibre, or with a shiny glazed ring or deep groove; a belt that has worn smooth and shiny, slips, or leaves a burr on the edge; an uneven bevel on the blade; a burnt smell. A very useful clue: if the first piece after every sharpen already looks poor, suspect the abrasive (or a mismatch between abrasive and blade) before the blade.
Replace or repair: replace the stone, wheel or belt (steps are in the maintenance section). Also check the sharpener pulley and actuator — for example the Lectra two-position sharpener drive pulley 704400 and the sharpener actuator bearing kit 704635. Shop the grinding parts category.
3. Blade guides, rollers and bushings in the head
What it does: keeps the blade straight and in line.
Why it wears: the blade slides on the guide with every stroke. Lint gets in and works like sandpaper. Lack of oil turns sliding into scraping. Carbide rollers last longer than steel, but they chip if the blade hits something.
Signs: grooves on the guide, side play when you wiggle the blade by hand (machine safely stopped and locked out), a wavy cut line, extra noise, and more Knife Intelligence corrections than usual. A strong clue: a brand-new blade repeats the same drift — then the guide, not the blade, deserves the inspection. If your test program allows it, compare the same curve cut in both directions.
Replace or repair: replace guides and rollers as a set when possible — a new blade in a worn guide wears out fast.
4. Presser foot
What it does: holds the top of the lay, guides the blade at the top, and on some brands carries a sensor.
Why it wears: constant sliding on plastic film, heat from the blade, and hits on lay edges and bundles. Rollers in the foot flatten; springs lose force; dirt can stop the foot from moving freely.
Signs: film tears, the top ply lifts or bunches at corners, a repeated witness mark on the fabric, a narrow piece pushed out of place as the head passes, scratches on the foot base, rollers that do not spin freely. Eastman's weekly check is a good habit on any brand: rotate the presser foot by hand — it should turn freely with no play against the head plate (Eastman E-551).
Replace or repair: replace worn plates and rollers, and check springs and the sensor setting afterwards. The Paragon manual describes a Ki sensor calibration step at the presser foot bowl, so plan for a calibration after replacement.
5. Bristle blocks (the cutting bed)
What it does: supports the stack, lets the knife tip pass, and lets the vacuum air flow while still sealing under the film.
Why it wears: the knife tip enters the bristles thousands of times in the same zones. Pins bend, split, flatten, lose height, break or melt. Lint and fabric dust pack the gaps. Running the blade too deep speeds this up. Material matters too: in my experience nylon pins flex away from the knife, so they are tougher and last longer but cost more; PP pins are stiffer and break more easily, but they do not absorb water. In many hot, humid cutting rooms in Vietnam and Thailand, nylon swells slightly — and with 20 blocks on one aluminium bar, small swelling adds up — so many customers there choose PP. Gerber itself offers its bristle squares in both nylon and polypropylene (Gerber Technology consumables, PDF).
Signs: "bald" zones, soft vacuum in one area, the lay creeping during a cut, bottom plies still connected by yarns, uneven height between rows. On a conveyor, remember that a damaged block travels with its carrier — so if the fault follows one block, map it by carrier position so maintenance can find it again.
Replace or repair: clean a lint-loaded but healthy area first and repeat a known test cut. Rotate blocks from low-wear edges into the high-wear centre, then replace blocks with missing or collapsed filaments, a damaged base, or a repeatable bottom-ply fault. Eastman's manual shows how simple the swap is on its machines: advance the conveyor to expose the damaged block, pull it from its aluminium slat, and snap the new block in with the tabs aligned (Eastman E-551). Always match size, base and foot shape — for example Gerber bristle block 1011273000, the white poly Gerber block 96386004 for GT1000 / 3200 / 3250 (listed at 101.5 × 101.5 × 26 mm), Lectra VT5000/VT7000 bristle block 130297 / 702583, Bullmer bristle block 170144065 or the Eastman PP bristle block 100×100×42 mm. See all in the bristle category.
6. Timing belts and pulleys (X, Y, theta and knife drive)
What it does: carries motion from servo motors to the gantry, carriage, knife rotation and, on some heads, the knife drive itself. These are synchronous (toothed) belts, so they do not slip — until they wear.
Why it wears: constant start-stop at high acceleration (Bullmer's Procut brochure lists up to 90 m/min positioning speed and up to 1 g acceleration), wrong tension, dust and misaligned pulleys. Teeth round off, the backing cracks, edges fray and the belt stretches.
Signs: position errors, steps in long straight lines, circles that are not round, clicking noise, black dust under the belt, frayed edges or missing teeth. Ask whether the symptom lines up with a knife stroke, a change of direction or a conveyor move — that tells you which belt to look at.
Replace or repair: replace the belt and check the pulleys are tight on their shafts. Examples: the Lectra X-axis drive timing belt 128665, the Bullmer timing belt 16T5-500, 012424 and the Gerber knife-drive belt 180500077 mentioned above. If your table uses felt conveyor belts, see felt conveyor belts.
7. Bearings, linear bushings and linear guides
What it does: lets shafts and carriages move smoothly. Many cutters run the carriage and head on linear-motion bearings.
Why it wears: fine fabric dust, missing grease, heat and vibration from the knife drive.
Signs: rumbling or grinding noise, heat at the bearing, play in the carriage, rough feel when you push the head by hand with power off — and backlash. Backlash is the movement a drive has to take up before the driven part starts moving the other way. A long edge cut in one direction may look fine, while a detail reached from the opposite direction keeps landing off. Eastman even lists checking both X and Y axes for backlash as a daily task (Eastman E-551).
Replace or repair: replace — bearings are cheap compared with a crashed shaft. Examples: Bullmer D8002 608 deep-groove ball bearing 053081, Lectra radial ball bearing 120913, Lectra open linear bushing 103060, Lectra prismatic linear guide rail 123941 and FK central bearing assembly N09.0002S120. More mechanical parts are grouped in other parts.
8. Vacuum turbine, film, seals, filters and grease
What it does: creates hold-down. Bullmer lists an integrated vacuum turbine of 13.5–17.5 kW for the Procut (Bullmer), and the Zenodo study notes that suction blowers are usually the component that uses the most power in cutting operations (Zenodo).
Why it wears: lint clogs filters, so the turbine works harder and hotter. Seals leak; film tears. Turbine bearings need high-temperature grease. Note that a loaded filter is a service condition that can look exactly like a failing part.
Signs: vacuum gauge below normal, louder or higher-pitched turbine, more heat, low-vacuum warnings. Compare the hold-down before the first cut with the moment the fault appears, and record film condition and open cut area at the same time.
Replace or repair: clean or replace filters often; grease on schedule. Stak lists the Lectra filter sponge disc 130496 and the Lectra high-temperature turbine grease cartridge 135177.
9. Cables, drag chains, air hoses, motors and sensors
What it does: carries power, air and signals to a moving head. Cables run in a cable carrier (drag chain). Motors are servomotors with feedback from a rotary encoder. Pneumatic parts lift the presser foot and tools.
Why it wears: millions of bend cycles, rubbing, lint, oil and heat. Eastman's weekly check includes looking for wires or air hoses rubbing inside the head (Eastman E-551).
Signs: errors that come and go when the head is at one end of the table, encoder or following errors, air leaks, sharpener or drill not responding. Gerber users can cross-check messages in my Gerber cutter error codes article.
Replace or repair: replace damaged cables and hoses first (cheap); test motors and boards before replacing them (expensive). Examples: Lectra sharpener actuator cable 703273, FK plate with strength sensor N09.0002S426.
Wear-part summary table
| Cutter wear part | Wear speed (relative) | Main cause of wear | First sign on the pieces or machine | Usual action |
|---|---|---|---|---|
| Cutting blade | Very fast: about 4–6 single shifts for M2 on shirting | Abrasion, heat and the steel lost at every sharpen | Fuzzy edges and uncut yarns, worst on the bottom plies | Replace the blade; blades cannot be repaired |
| Sharpening stone, grinding wheel or belt | Belts fastest of all (1–2 shifts); stones and wheels 5–10 weeks | Abrasive grains wear away; the surface glazes with melted fibre | The first piece after every sharpen is already poor | Replace the stone, wheel or belt |
| Blade guides and rollers | Fast | Rubbing from every blade stroke, plus lint | A brand-new blade repeats the same drift | Replace guides and rollers as a set |
| Presser foot | Medium | Sliding on plastic film, heat from the blade | Torn film; the top ply lifts at corners | Replace the plate and rollers, then recalibrate |
| Bristle blocks | Medium | Knife-tip plunges, a blade set too deep, humidity | Soft vacuum and bald zones on the bed | Clean, rotate edge blocks to the centre, then replace |
| Timing belts | Medium | High acceleration, wrong tension | Steps in straight lines, position errors | Replace the belt and check the pulleys |
| Bearings and linear bushings | Slow to medium | Fabric dust, missing grease | Noise, heat and backlash | Replace the bearings or bushings |
| Vacuum filters and seals | Depends on the lint load | Clogging and leaks | Vacuum gauge below normal, low-vacuum warnings | Clean or replace filters and seals |
| Cables, hoses and sensors | Slow | Repeated bending, rubbing, heat | Intermittent errors at one end of the table | Test first; replace cables or hoses before motors and boards |
How Do Fabric Type and Ply Height Change Wear?
Abrasive, dense or coated fabrics and high lays wear parts fastest. Denim dulls blades and stones quickly; synthetics add heat and fusing; knits and linings need good spreading and vacuum; foam-backed fabric compresses and springs back; and high stacks multiply blade deflection and bristle wear.
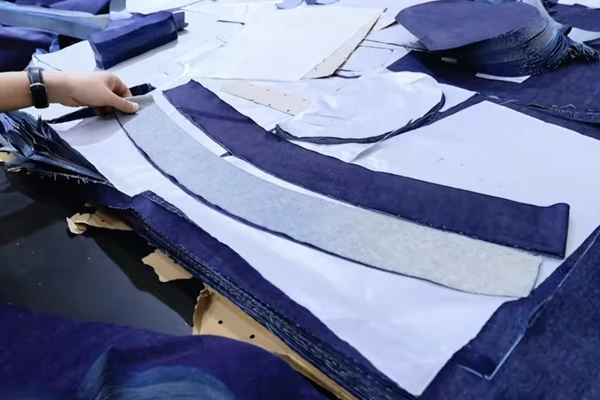
The same machine can cut T-shirts in one factory and car seats in another — and the wear pattern will look completely different.
Denim and heavy twill
Denim is a strong, tightly woven cotton twill, often with hard dyes and finishes. It is abrasive, so blades and stones go first — which is why we recommend M35 blade steel for denim (see Stak's view in the blade section). Researchers who fitted sensors to an industrial oscillating-knife head to study multi-ply cutting forces chose denim as their starting material (International Journal of Clothing Science and Technology, 2017, DOI). Lectra sells a dedicated Vector Denim version and Stak lists denim-specific Lectra maintenance kits — a hint that denim rooms need their own wear plan. Watch the tight pocket and fly curves: a long straight can look clean while the lowest plies miss the curve.
Knits and stretch fabrics
Knits are soft and springy. They need good vacuum and a sharp blade, or they pull and distort; dull blades and worn bristle show up here first as "chewed" edges. Measure pieces after the relaxation time your job specifies.
Smooth linings
Slippery plies can slide against their neighbours. Keep the plies in order when you inspect, and check whether several landmarks moved together — that points to ply movement rather than a worn part.
Synthetics, coated and technical textiles
Polyester, nylon fabrics and coated materials can melt at the blade edge, and layers can fuse together. Machines fight this with blade cooling, temperature control and corner control; Eastman, for example, lists a knife chiller and "control of corners to minimize fusing" on the Talon 25x (Eastman Talon 25x brochure, PDF). For parts, it means more glazing on stones and more residue in guides — clean more often. On coated goods, also look for adhesive transfer between plies.
Automotive fabrics, foam-backed seating, leather and PU
Automotive seat fabric is heavy and dense, often laminated with foam. It loads the knife drive, belts and bristles hard, and foam compresses during cutting and recovers when unloaded — so check the relaxed outline against the template. I covered why Lectra leads this segment in why Lectra leads in automotive seat cutting.
High ply stacks
A higher lay means a longer blade working deeper, more side force on curves, and more knife-tip movement in the bristles. Gerber's manual says Knife Intelligence becomes a requirement above 3 cm compressed. My rule: the higher you stack, the shorter your inspection interval should be — and always qualify a new ply count on the hardest feature of the job, not on a big rectangle.
| Material and typical piece | Cutter parts that wear faster | What to watch on the pieces |
|---|---|---|
| Denim — pocket and fly curves | Blade, stone, guides | Dust, dull edge, bottom-ply curve |
| Stretch jersey — sleeve, neckband | Bristle, blade | Vacuum, pulling, relaxed size |
| Smooth lining — paired panels | Bristle, film | Plies sliding together |
| Thermoplastic / coated — small tabs, close curves | Stone, guides, presser foot | Fusing, glazing, adhesive transfer |
| Foam-backed seating — long bolsters | Knife drive, belts, bristle | Steps at bite boundaries, recovery |
| High lays | Blade, guides, bristle | Top–bottom mismatch |
How Do You Read a Bad Cut Before Ordering a Part?
Keep the top, middle and bottom pieces from the same cut, then find where the error repeats: by lay depth, bed position, pattern position or time. Each pattern points to a different part — blade and guides, bristle, vacuum and film, belts and bearings, or the cut file itself.
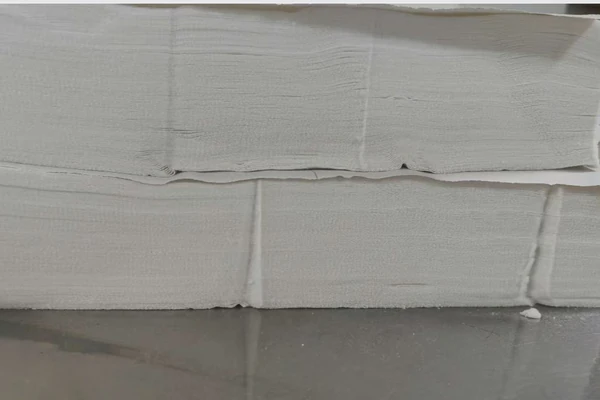
Before you touch the software — or order a part — check the hardware and the evidence. Sensing and compensation such as Gerber's Knife Intelligence can only correct small errors: when a guide has play, the system keeps correcting while the base error grows every hour.
Three questions narrow most faults down to one assembly:
- Does the error grow from the top ply to the bottom ply? Then suspect blade deflection (a worn blade, guides or rollers) or ply movement (spreading, vacuum, film).
- Does the error follow a place? A fault that follows one bristle block points to the bed; a fault that follows one digital feature wherever that piece is placed points to the cut file; a fault that lines up with a conveyor bite points to feed registration.
- Is the first piece after a new blade or a fresh sharpen already bad? Then the blade is not the cause — check the guides, the abrasive and the sharpening trigger.
| Symptom on the pieces | Most likely worn part or cause | What to check first |
|---|---|---|
| Bottom ply larger or smaller than the top ply, worst on tight turns | Blade deflection from a worn blade, worn guides or rollers, or a deflection-sensing setting that needs calibration | Blade width, guide play and Knife Intelligence calibration |
| The same notch is off by the same amount on every ply | A cut-file problem, not part wear | Compare the exported cut file with the approved master pattern |
| Fuzzy, frayed or "chewed" edges | A dull blade, or a worn sharpening stone or belt | The result right after a sharpen, and the stone or belt surface |
| The lay slides, or small tabs move late in a marker | Worn bristle blocks, film leaks, too much open cut area or a clogged vacuum filter | Bristle surface, film, cut order and filter |
| The bottom plies are still joined by yarns | Weak bed support, a compressed height that is too high, too little knife penetration, or a dull edge | The bristle under that spot, the lay height and the depth setting |
| Steps in straight lines, out-of-round circles, or error in only one direction of travel | Worn timing belts, loose pulleys, worn bearings or backlash | Belt teeth and tension, carriage play |
| The blade breaks often | Worn guides, or worn bristle that lets the blade hit the base | Guides, bristle condition, depth setting, and clips left in the lay |
Stak's view: When customers send us photos of ruined pieces, we usually ask for a short real-time video of the cutter at work, so we can see the knife stroke, the sharpening action and whether the fabric moves during the cut. That is how we tell whether the problem lies in a part — and which one — or in the software.
How Should You Plan Preventive Maintenance?
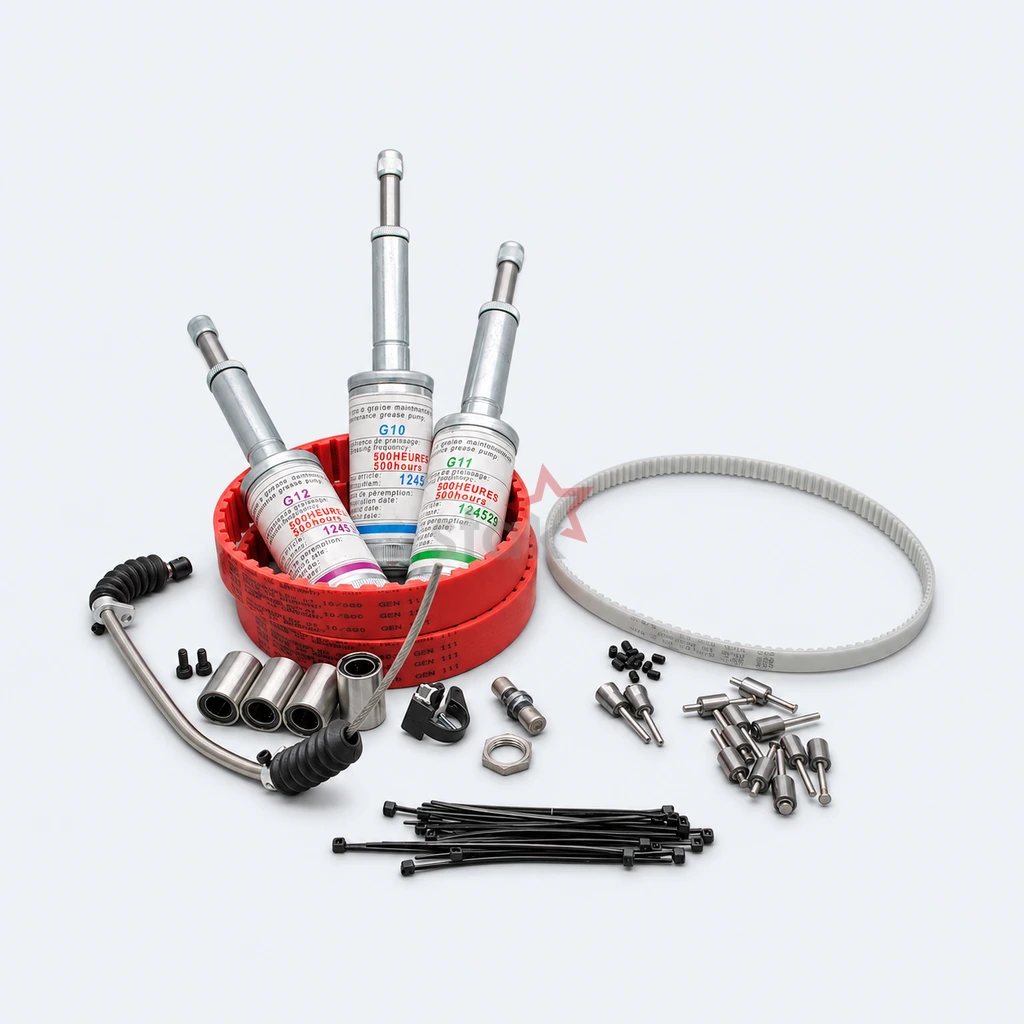
Plan maintenance in two layers: short daily and weekly habits done by operators (cleaning, checking vacuum, blade, stone, belts and backlash), plus hour-based service when the running-hour counter reaches the kit intervals in your manual, such as 500H, 1000H, 2000H and 4000H.
What does a real OEM schedule look like?
Manufacturers publish their own schedules, and they are worth reading even if you run a different brand. Eastman's MPC 5000 manual suggests allowing 5 to 10 minutes for daily inspection, 30 minutes weekly and one hour monthly (Eastman MPC 5000 service manual, Form E-551, PDF). Its tasks include:
- Daily: inspect the machine and cutting surface for debris and loose cables; vacuum the bristle surface; check X and Y axes for backlash; check the connecting link is secure; check blade edges for nicks; at the end of the day blow dust off the knife guides and sharpening housing.
- Weekly or every 40 hours: lubricate the rail linear bearings and knife coupling; clean the Y-car; inspect the head for rubbing wires or air hoses; rotate the presser foot by hand to check for play; check deflection of the reciprocating-drive and theta-drive belts.
- Monthly: check drive belts for cuts, frays or missing teeth; check belt tension against backlash; check that pulleys are tight on their shafts; inspect electrical connections and power-supply connectors for heat discoloration.
A practical calendar for any multi-ply cutter
The table below is practical shop guidance, not an OEM specification. Always follow your own machine manual first, and have qualified people lock out power and air before working on the head, drives or guarded parts.
| When | What to do |
|---|---|
| Start of shift / material change | Keep a reference piece from a known-good setup; record material and lot, marker revision, ply count, compressed height, blade reference and vacuum reading |
| Every shift | Wipe lint from the head and sharpener; check the blade and the stone or belt; check vacuum level and film supply |
| Daily | Clean the bristle surface (use the bristle cleaner if your machine has one); check presser foot rollers; check backlash; empty dust trays |
| Weekly | Inspect guides and rollers for play; check belts for dust and cracks; clean or change vacuum filters; lubricate as the manual says; check the oil level for automatic lubrication |
| Monthly | Rotate bristle blocks from the edges to the centre; check belt tension and pulleys; inspect drag-chain cables and hoses; listen to the bearings |
| By running hours | Fit the maintenance kit for that interval (e.g. 500H / 1000H / 2000H / 4000H on Lectra Vector) |
What hour-based kits are
Lectra organises service around running hours. Its Vector Fashion iX2 and Q2 page mentions "1000 hours between every maintenance cycle" (Lectra), and its Vector Fashion page talks about hundreds of sensors, automatic preventive-maintenance alerts and "a permanent bristle cleaner" (Lectra Vector Fashion).
At Stak we publish compatible Lectra MTK kits by model and interval — for example the 500H kit 705665 for Vector FU Q25-72, the 2000H kit 704239 for Vector Fashion MH and the 4000H kit 704240 for Vector Fashion MH. Within the same kit series, higher-hour kits are cumulative: they include the lower-hour parts plus the extra ones needed at that interval. Not every model has every interval — our current Q25 listing offers 500H, 1000H and 4000H but no 2000H. Details are on the maintenance kit page and in the maintenance kit category.
How long do blades, belts and stones last?
Our engineers plan the sharpener around the blade. On a stone or wheel sharpener, one stone or wheel covers about 6–12 blades. On a belt sharpener it works the other way round: a belt lasts only a shift or two, so each blade uses about 2–4 belts. The figures below come from Stak's engineers and from field data shared by other cutter engineers in the industry. They assume a 7 cm compressed lay: 260–300 plies of 120–130 g/m² cotton shirting, or 60–70 plies of 12–14 oz denim.
| Consumable | Fabric | Running hours | On one 8-hour shift a day |
|---|---|---|---|
| M2 HSS blade | Shirting | 30–50 | 4–6 shifts |
| M2 HSS blade | Denim | 15–25 | 2–3 shifts |
| M35 cobalt HSS blade | Shirting | 40–60 | 5–8 shifts |
| M35 cobalt HSS blade | Denim | 25–40 | 3–5 shifts |
| Sharpening belt | Shirting | 8–15 | 1–2 shifts |
| Sharpening belt | Denim | 4–8 | Half a shift to one shift |
| Sharpening stone or grinding wheel | Shirting | 200–400 | 5–10 weeks |
| Sharpening stone or grinding wheel | Denim | 120–250 | 3–6 weeks |
| Bristle blocks, busy centre of the bed | Garment fabrics | 960–1,600 | 6–10 months |
| Bristle blocks, busy centre of the bed | Frequent denim | 640–960 | 4–6 months |
Reference values only. Replace by condition. These are not OEM-guaranteed figures. Running hours are the hours the cutter is switched on and cutting or ready to cut — not downtime, waiting for fabric or changeovers. One shift is 8 running hours, of which about 6 are actual cutting; a week is 5 shifts (40 hours), and a month is taken as 160 hours. Bristle blocks are not tied to the blade, so replace them by the signals on the bed.
Why the numbers move together. A harder blade lasts longer, but it also wears the abrasive harder at every sharpen. If you switch from M2 to M35 and keep the old belt-change interval, the belt wears smooth while the blade is still good: the cut gets worse and the blade takes the blame. So whenever you change the blade steel or the ply height, rescale the belt and stone intervals in proportion. M35 gains most on denim, where it lasts about 1.6 times as long as M2; on shirting the gain is closer to 1.2–1.3 times.
What shortens them. Fabric with sand or heavy sizing, lays above the rated height, weak vacuum and badly set sharpening parameters (sharpening time and distance) can each cut real life by 30–50%. Denim as a whole runs about 40% shorter than light shirting.
What "end of life" means. Not a broken blade. A blade, belt or stone has reached the end of its life at the last point where the edges are still clean with no stringy yarns, the top and bottom plies are within tolerance, and every ply is cut through.
A worked example. One shift a day on shirting with M2 blades (about 160 running hours a month) uses roughly 3–5 blades a month, plus 11–20 belts on a belt sharpener or a new stone or wheel every 5–10 weeks on a stone sharpener. Check these against your own log before you set reorder points.
One fixed interval. A few small sharpener parts are changed by the clock instead of by condition. On iEcho GLSC cutters, for example, the maker's service engineers replace the two sharpener baffle plates every 500 running hours — about 12–13 weeks on one shift — however they look.
How do you replace a sharpening stone or belt?
The order below is general; screws, guards and calibration steps differ by model, so follow your OEM manual for the exact procedure and lock-out.
- Stop and lock out the machine. Isolate power and air before your hands go near the head.
- Remove the guard over the sharpener.
- Loosen the clamp or retaining nut that holds the stone or wheel, and note the order of any spacers.
- Fit the new stone with the spacers in the same order, and tighten the clamp to the specified torque.
- Check the stone's position against the blade, and adjust it if your model has a manual adjustment.
- Refit the guard, restore power and run a test cut on scrap. Inspect the top and bottom ply edges.
A quick symmetry check engineers use: colour the tip of a new blade with a black marker (a used blade's bevel will mislead you), run one sharpen, and look at where the marker has gone. It should be ground off equally on both sides; if it is not, adjust the stone or wheel position. On sharpeners with an upper and a lower wheel, each wheel should grind its own half of the edge.
On belt sharpeners, release the belt tension, fit the new belt in the running direction marked on it, re-tension, and test-cut. If your cutter software has "new knife" and "new belt" functions, use them after every change so the machine knows a new part is fitted. If the blade is still dull after a new stone or belt, check the blade itself and the sharpening interval in the cutting parameters. A new grinding wheel can also eat blades faster: if it does, engineers shorten the sharpening time and lengthen the cutting distance between sharpens.
Keep a simple log
Write down running hours, knife-down cutting distance (not just wall-clock hours, which include spreading and idle time), sharpening events, blade, belt and stone changes, and vacuum readings. After a repair, record the removed part, the replacement reference and which defect disappeared or stayed, then recut the original difficult feature and keep the approved sample with the maintenance entry. After a few months you will know your own wear rate — worth more than any generic chart, because it reflects your fabric, your stack height and your climate.
Stak's view: In China we can usually courier parts to a customer the next day; overseas shipping takes 3–5 days at the fastest. So keep some stock of your own: at least one to two months' usage of blades and sharpening stones or belts, and at least 200 bristle blocks so you can quickly replace the most worn area of the bed. If you are really in a hurry, a local cutter agent or parts dealer can bridge the gap — a day of lost production usually costs far more than the part itself.
What Should You Check Before Buying a Used Cutter?
Before buying a used multi-ply cutter, confirm the exact model and that its blades, bristle and key parts are still available, then check running hours and service records, the cutting head, the vacuum, the bristle bed, software licences, and a full-height test cut on your own fabric.
In our experience, the biggest hidden costs in a used cutter are:
- Knife-drive wear inside the head — the most expensive area to rebuild.
- Collapsed bristle blocks — a full bed is a significant cost on a large table.
- Vacuum leaks — the turbine, seals and filters are costly to restore.
- Ageing electrical controls and servos — plus parts availability for discontinued models.
- Altered running-hour records — only a test cut proves the machine's condition.
The one test that really matters: ask the seller to replace every damaged part, then run your own fabric at maximum cutting height for a day or two and compare the top, middle and bottom pieces before you pay.
Should You Buy OEM or Compatible Spare Parts?
Buy OEM when the part is under warranty, safety-critical electronics, or a new design with no proven alternative. Compatible parts make sense for high-volume consumables — blades, stones, bristle, belts, bearings and kits — as long as dimensions, material and mounting match the original exactly.
Consumables are bought again and again, so price matters. But a cheap part that does not fit is the most expensive part of all. A compatible part is a replacement made to fit the same machines as an original part number — it is not an OEM part, and it should never pretend to be.
| Factor | OEM part | Compatible part (e.g. Stak) |
|---|---|---|
| Fit | Guaranteed for that model | Must match dimensions, base, holes, material |
| Price | Usually higher | Usually lower |
| Lead time | Depends on dealer and region | Stak: typically 1–7 days after confirmation for listed kits |
| Choice | One spec | Can offer options (e.g. nylon or PP bristle, OEM colours) |
| Best for | Electronics, warranty, new designs | Blades, stones, bristle, belts, bearings, kits |
What has to match: the part number reference, length/width/thickness, hole pattern and mounting base, and material and hardness where it matters. What does not have to match: the logo and, for bristle, sometimes colour (Stak usually follows the original colour, and can do OEM colours on request). Before shipment, Stak matches each compatible part to the OEM part number or the customer's sample and checks critical wear faces visually and dimensionally — see our factory quality page. You can also request a sample kit before a bigger order, or read more about Stak.
Stak's view: When customers switch from OEM to compatible parts, they usually ask four things: Will accuracy drop? Will the parts wear faster? Could they damage the cutting head, the sharpener or the bristle bed? And will they actually fit?
Our compatible parts are made to the OEM drawing dimensions, so they fit the matching machines and, under normal working conditions, perform close to the OEM part; installed correctly, they will not damage the cutter. Some even use exactly the same material: Lectra uses VSM sharpening belts and we use the same VSM model; Morgan Tecnica uses STARCKE and we use the same STARCKE model. We recommend trying a sample first. If you find a problem when the goods arrive, we replace them immediately, free of charge; if something unusual happens in use, we study the on-site video and take responsibility for the result. Of course, wear after normal use is expected for consumables.
How Do You Order the Right Replacement Part?
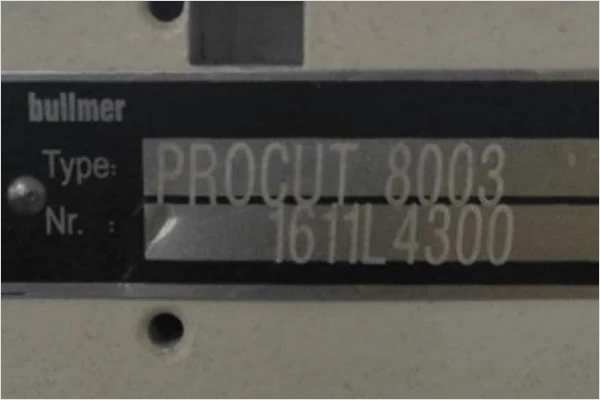
Send five things: every part number printed on the part or pack, the exact machine model and head version from the nameplate, clear photos of both the working side and the mounting side, the quantity, and your ship-to country. With these, Stak can confirm fit and quote without guesswork.

Why a ruler is not enough
Stak lists two Gerber-family blades with the same nominal size, 255 × 8 × 2.35 mm: 1013522000 for the Atria GT7 and 21261011 for the Paragon HX / VX and other models. A ruler can measure length, width and thickness. Only the full part number, the mounting-end shape and the head configuration tell you which one you need.
What to send for each part type
| Part | Also send |
|---|---|
| Blade | Full reference with any suffix; photo of the mounting end |
| Bristle block | Footprint (L × W × H), foot or underside fastener, photo of the underside |
| Stone, wheel or belt | Which sharpener assembly it fits; grit or marking; size |
| Timing belt | Its function (X, Y, theta, knife drive), marking, pitch and width |
| Bad-cut problem | Marker piece ID, labelled top/middle/bottom samples or photos, measuring datum, and whether the fault follows a turn, a bed location or a bite |
Where to look for part numbers
Part numbers live on the part, the pack, the parts manual and the maintenance-kit label. Gerber often uses 8-digit numbers, Lectra often 5–6 digits, Bullmer often pairs a short code with a 701xxxxx code, and FK often uses an Nxx.xxxxS form. My part number lookup guide shows real examples, and the Gerber–Lectra part number cross reference helps when one machine family has old and new codes. If the stamp has worn away, send photos of the part and the nameplate and we will help identify it.
Brand hubs
- Lectra cutter parts and the Lectra category
- Gerber cutter parts, Gerber GTXL cutter parts and the Gerber category — for XLC7000 / Z7 see also the arm bushing support 91000000
- Bullmer cutter parts and the Bullmer category
- FK cutter parts, Kuris cutter parts, Yin cutter parts, Morgan Tecnica cutter parts, OROX cutter parts and IMA cutter parts
Copy-paste inquiry
Part number(s) (with suffix):
Machine brand + full model + head version (nameplate photo attached):
Photos of the part (working side, mounting side, installed position):
Quantity:
Ship-to country:
Frequently Asked Questions
How many layers can an automatic fabric cutter cut?
It depends on the model's maximum compressed cutting height and on how thick each ply is. Published limits range from under 2.5 cm on Lectra's low-ply Vector Fashion iX2 and Q2, through 3 cm on the Eastman Talon 25 and 7 cm on the Eastman Talon 75, to up to 80 mm on the Bullmer Procut D 8001 S. As a rough guide from Stak customers, at 7 cm of cutting height (compressed under vacuum) a cutter can reliably cut 260–300 plies of regular 120–130 g/m² cotton shirting, while for regular 12–14 oz denim we suggest about 70 plies. Vacuum and how flat the lay is spread both affect the real ply count, and thick or springy fabric fits fewer plies in the same height. Then qualify the ply count on the job's hardest feature: a narrow collar point can hit its quality limit before a big rectangular panel from the same roll.
How long does a blade last on a multi-ply cutter?
On a 7 cm compressed lay, Stak's engineers plan for about 30–50 running hours from an M2 HSS blade on regular cotton shirting (4–6 single shifts) and 15–25 hours on 12–14 oz denim. An M35 cobalt HSS blade gives about 40–60 hours on shirting and 25–40 hours on denim. These are reference values, not OEM-guaranteed figures, so replace by condition: real life depends on the fabric (including its sizing and sand content), the blade steel, the grinding condition and how much each sharpen removes, the vacuum, the ply height, piece size and cutting distance. Use the machine maker's discard limits and your own history: log knife-down distance, sharpening count, material and compressed height, and note whether a blade left because of a chip or because it was simply worn narrow — those are different events in a spare-parts forecast. The full planning table is in the maintenance section under How long do blades, belts and stones last?
How often should I replace bristle blocks?
Replace by signals, not by date: bald zones, soft vacuum, creeping lays, or bottom plies that stay joined over the same spot. As a planning guide, in a busy garment cutting room the heavily used centre of the bed typically needs new blocks every 6–10 months (about 960–1,600 running hours on one shift) — or every 4–6 months if you cut denim often — while the edges last much longer, so partial replacement is common. Clean and rotate first, map problem blocks by carrier position, and keep at least 200 blocks in stock so you can replace the worst area quickly. The bristle blocks guide covers this in depth.
Why does my top ply not match my bottom ply?
Usually blade deflection (a worn blade, guides or rollers, or a deflection-sensing system that needs calibration) or ply movement (spreading, vacuum or film). If only tight turns drift, suspect the blade side; if several landmarks moved together, suspect ply movement. If every ply is off by the same amount, check the cut file.
Why do the bottom plies stay joined when the top edge looks clean?
Inspect before anyone pulls the stack apart. Fine uncut yarns across the bottom point to the cutting edge, permitted penetration, actual compressed height or local bed support. A shiny, bonded edge on synthetic plies calls for a heat or coating check instead.
How often should I replace a sharpening stone or belt?
When a fresh sharpen no longer restores the edge, the stone shows a shiny glazed ring or a deep groove, or the belt has worn smooth, slips or leaves a burr. As planning figures from Stak's engineers, a sharpening belt lasts about 8–15 running hours on shirting (1–2 single shifts) and 4–8 hours on denim, so each blade uses about 2–4 belts. A sharpening stone or grinding wheel lasts about 200–400 hours on shirting (5–10 weeks on one shift) and 120–250 hours on denim (3–6 weeks), which covers about 6–12 blades. These are reference values, not OEM-guaranteed figures — replace by condition. If you change the blade steel or the ply height, recalculate both intervals: a harder M35 blade wears the abrasive faster.
How often should I fit a maintenance kit?
Follow the running-hour intervals in your machine manual. Lectra Vector kits come in 500, 1000, 2000 and 4000 running-hour versions, and Lectra lists 1000 hours between maintenance cycles for the Vector Fashion iX2 and Q2. Within the same kit series, higher-hour kits include the lower-hour parts plus extra ones.
How many spare parts should a cutting room keep in stock?
Stak recommends at least one to two months' usage of blades and sharpening stones or belts, and at least 200 bristle blocks. Overseas shipping takes 3–5 days at the fastest, and a day of lost production usually costs more than that stock.
Can I use a maintenance kit from a different Lectra model?
No. Kits are matched to the exact model, application code (FA, AU, FU, TT) and interval. Send your nameplate photo and original kit reference so we can confirm the right one.
Are bristle blocks interchangeable between brands?
Some are. Certain square-corner designs and some foot types are shared by several brands, but many are not. Always check size, base and foot shape, or send a photo of the underside.
Can compatible parts replace original parts — and do they void my warranty?
A compatible part is made to fit the same machines as the original part number, but it is not OEM. Confirm the part number and model, and ask for dimensions and material if you want to compare. Warranty depends on your machine contract — if your machine is under an OEM service contract, check it first. Many factories switch to compatible consumables after the warranty period.
What is the difference between a knife cutter and a laser cutter?
A knife cutter cuts mechanically and can cut a compressed stack of many plies. A laser cutter cuts with heat, usually one layer at a time; it suits synthetics and fine detail but is not used for thick multi-ply lays.
What should I send with a sample of a bad cut?
The marker piece ID, top/middle/bottom samples or labelled photos, the measuring datum, and whether the fault follows a turn, a bed location or a bite. If you have already found the suspect part, include its full marking and a mounting-side photo.
Are Stak and icutterpart.com the same company?
Yes. Stak is the trading name of Shanghai Stak Enterprise Co., Ltd, and icutterpart.com is Stak's website and online shop for compatible automatic cutter parts.
What is the fastest way to get a quote from Stak?
Send the part number, machine model, photos, quantity and ship-to country through the contact page. Listed maintenance kits usually ship within 1–7 days after confirmation. More common questions are on the FAQ page.
Conclusion: Keep the Relay Running
An automatic fabric cutting machine is only as good as its weakest wear part. The blade, stone, guides, presser foot and bristle bed decide whether piece one and piece fifty in a stack are the same shape. Belts, bearings and filters decide whether the machine keeps doing that every day. When you understand how each step works — and keep the top, middle and bottom pieces when something goes wrong — a bad cut stops being a mystery and becomes a part number.
Ready to replace a worn part? Send your part number, machine model, photos, quantity and ship-to country to Stak through the contact page, or browse the shop. I will check the fit and come back with a clear quote.
Compatible parts for these machines: Stak supplies compatible blades, bristle blocks, sharpening stones and belts, blade guides, presser-foot parts, timing belts, bearings and maintenance kits for Lectra Vector, Gerber Paragon, Gerber Atria, Gerber GTXL, Gerber GT1000, Gerber XLC7000, Gerber Z7, Bullmer D8002, Bullmer Procut, Eastman Talon, FK Group, Kuris, Yin, Morgan Tecnica, OROX and IMA cutters.
Jessie Xiao is a sales manager at Stak (Shanghai Stak Enterprise Co., Ltd, the company behind icutterpart.com). Jessie has 20 years of experience matching compatible parts for Lectra, Gerber, Bullmer and other multi-ply cutters to cutting rooms in Vietnam, Bangladesh, India, Brazil and Italy. LinkedIn: jessie-xiao-1119aa117.
Mr. Zhou is an engineer at Stak and provided technical support and consultation for this guide.
Continue reading
- Fundamentals: Multi-ply vs single-ply cutters · Lectra vs Bullmer
- Wear parts: Bristle blocks guide · Cutting blades · Grinding parts guide · Lectra MTK maintenance kits
- Troubleshooting & ordering: Gerber cutter error codes · Part number lookup · Gerber–Lectra part number cross reference
Disclaimer: Lectra, Gerber, Bullmer, Eastman, FK, Kuris, Yin, Morgan Tecnica, OROX, IMA, iEcho, Audaces and other brand names are used only to describe compatibility or to cite public information. Stak (Shanghai Stak Enterprise Co., Ltd) supplies compatible replacement parts and is not affiliated with, endorsed by or sponsored by these manufacturers. Machine specifications quoted come from the linked manufacturer pages and may change; always follow your machine manual. Wear-life figures in this guide are reference values from Stak's engineers and other cutter engineers in the industry, not OEM-guaranteed values: replace parts by condition.
Sources
- Lectra — Vector Fashion: https://www.lectra.com/en/fashion/products/vector-fashion
- Lectra — Vector Fashion iX2 and Q2: https://www.lectra.com/en/fashion/products/vectorfashion-ix2-and-q2
- Lectra — Gerber Paragon (furniture): https://www.lectra.com/en/furniture/products/gerber-paragon-furniture
- Lectra — Gerber Atria (fashion): https://www.lectra.com/en/fashion/products/gerber-atria-fashion
- Lectra — press release, acquisition of Gerber Technology completed (June 1, 2021): https://www.lectra.com/sites/default/files/2021-06/pr-gerber-technology-acquisition-finalized-06-01-2021-en.pdf
- Gerber Technology — Paragon documentation v1.5: https://www.gerberscientific.net/gt/eService/GetDocument/2%20ParagonDocumentation%20v1.5.ashx?Id=vR64yxWr04coc67tuPniAA%21%21&filename=2+ParagonDocumentation+v1.5.pdf
- Gerber Technology — Atria cutter user documentation: https://www.gerberscientific.net/gt/eService/GetDocument/1013269001-Atria%20Cutter%20User%20Documentation.ashx?Id=w4tEkw3CogvQmnF5N3eKxw%21%21&filename=1013269001-Atria+Cutter+User+Documentation.pdf
- Gerber Technology — Z7 brochure: https://www.gerbertechnology.com/pdf/z7_e.pdf
- Gerber Technology — Genuine service parts / consumables sheet: https://www.gerbertechnology.com/pdf/serviceconsumables_e.pdf
- Bullmer — Procut D 8001 S: https://www.bullmer.de/en/product/procut-d-8001-s/ and brochure https://www.bullmer.de/wp-content/uploads/2023/05/Procut_D_8001_S-ENG_small.pdf
- Bullmer — R 90 PRO: https://www.bullmer.de/en/product/procut-r90-high-layer-cutting-machine/
- Bullmer Poland — Procut D8001S: https://bullmer.pl/en/procut-d8001s/
- Eastman — Talon multi-ply cutting system: https://www.eastmancuts.com/products/talon/ ; Talon 25x brochure https://www.eastmancuts.com/wp-content/uploads/2017/04/Eastman-Talon25x-04-12-18.pdf
- Eastman — MPC 5000 service manual, Form E-551: https://www.eastmancuts.com/wp-content/uploads/2019/03/E-551.pdf
- Audaces — Premium spreader: https://audaces.com/en/solutions/premium
- International Journal of Clothing Science and Technology (2017), "Experimental study on cutting flexible sheet materials using an oscillating knife": https://doi.org/10.1108/ijcst-05-2016-0058
- Zenodo — "Comparative Study on Automatic Fabric Cutting Machine and Straight Knife Cutting Machine": https://zenodo.org/records/6615342
- Stak product pages (nominal blade sizes and HSS M2 material, abrasive and bristle specifications), icutterpart.com, retrieved 2026-11-19.
- Stak engineering — planning table for blade, sharpening belt, stone and bristle-block life (reference values, not OEM-guaranteed), compiled November 2026 from Stak's engineers and field data shared by other cutter engineers in the industry.