The cutter has stopped. The screen is showing a warning or an error. Someone already wants a part number — or pastes a plotter-forum code that does not belong on this machine.
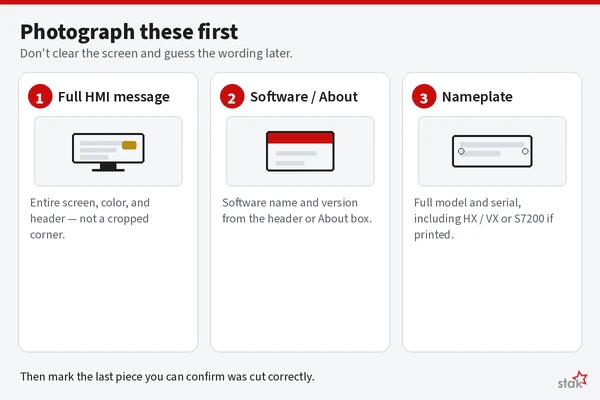
In the first 30 seconds, leave the message on the screen if it is safe to pause. Photograph the entire HMI, including the software name in the header, and write the exact text, any class or number, the color or severity, and the nameplate model. Do not clear the alarm to “try again” until that record exists. A Gerber cutter error code is a software alarm, not a catalog SKU. Use it to identify the alarm family, inspect the matching mechanical wear, and only then decide whether to RFQ a compatible part or call qualified OEM service.
This field guide covers Gerber models already listed on Stak: GTXL, XLC7000, Z7, Paragon (HX/VX), GT5250 / GT7250 (and related labels such as S7200 when present), and Atria GT7. It is a shop-floor lookup for technicians and buyers: how to read the screen, how to jump to a verified named message, what to check first, and when a wear-part RFQ is reasonable. It is not a substitute for the OEM service manual and does not reprint a complete official code table. Public sources do not provide a safe numeric encyclopedia for every listed model. Where a specific number is not published here, the official lookup is the help that shipped with your software. Brand names such as Gerber identify fitment only. Stak (Shanghai Stak Enterprise Co.,Ltd) is not affiliated with Gerber or other cutter brands.
Key Takeaways
- There is no single universal list of Gerber cutter error codes. Record the software name as carefully as the message.
- In the first 30 seconds, photograph the full screen and copy the exact message, software identity, and nameplate model before you clear the alarm. Mark the last piece you can confirm was cut correctly — a cleared alarm does not prove the marker is usable.
- Use the tables below to match a verified named message or a C-200MT class range, then inspect vacuum, knife, or motion wear. Do not invent a 1xxx meaning from a forum or a plotter list.
- A vacuum, knife, or motion alarm often starts as a sealing or consumable issue (bristle, seals, blade, stone, guides, belts) — not automatically a pump or board swap.
- Electrical, servo, and controller faults belong with OEM service or a qualified technician. This article does not provide electrical repair steps or part lists.
In this guide
- What to do in the first 30 seconds
- Identify your software family
- Named message lookup
- How to look up a C-200MT number
- Vacuum checks and related parts
- Knife and sharpening checks
- Motion, home, and jam checks
- What the stop means for the cut pieces
- Easily confused alarms, repeats, and misdiagnosis
- Why the alarm is not a part number
- Related parts and pages
- RFQ checklist
- Frequently asked questions
What to Do in the First 30 Seconds
Answer first: Capture the evidence while it is still on the screen. A cleared banner is hard to quote later, and a cropped photo hides the software name you need to look the message up.
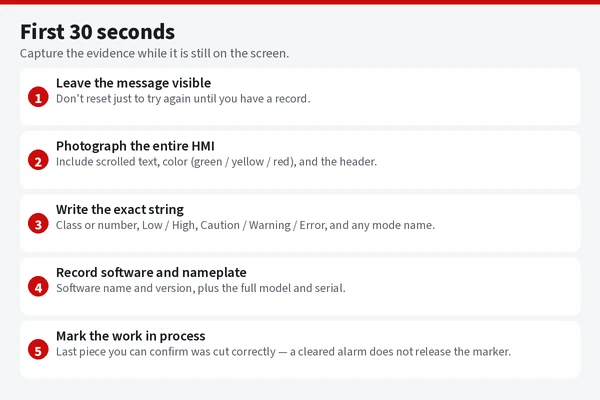
- Leave the message visible if it is safe to pause. Do not reset just to “try again” until you have a record.
- Photograph the entire HMI, including scrolled text, color state (green / yellow / red if shown), and the header.
- Write the exact string: class and number if present, every adjective (Low, High, Caution, Warning, Error), and any parameter or mode name (Biting, Cut, Continuous, Idle).
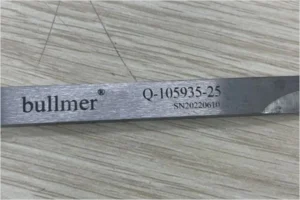
- Record the software name and version from the header, login screen, or About box, and photograph the nameplate (full model, including HX / VX or a related label such as S7200 when printed).
- Mark the work in process. Note the marker, the spread or hide, the ply count, and the last piece the operator can confirm was cut correctly. Do not assume a partly cut marker is complete.
Then, before anyone opens a guard or looks into the head or bed, lock out the machine. Follow plant lockout / tagout and the OEM manual. Do not reach into a live, moving head. Clear jams only when motion and cutting energy are verified safe. See OSHA lockout/tagout for the general framework; your plant procedure and the cutter manual still govern the job.
Add a short job note as soon as you can: material, ply count, whether the machine was biting, cutting, conveying, grinding, or homing, and any recent blade, stone, bristle, or filter change. If the alarm points at drives, safety circuits, or a controller condition you cannot map to a visible mechanical fault, stop. Keep the screen and nameplate photos, then call a qualified technician or OEM service. Do not bypass interlocks.
Identify Your Software Family
Answer first: Error systems differ by software family. Mixing a C-200MT number, a Paragon dashboard name, and a Gerber plotter list is how plants order the wrong part — or look up the wrong meaning.
| Software / platform family | How alarms typically appear | What to record | Do not confuse with |
|---|---|---|---|
| Older GERBERcutter C-200MT software | Numbered messages in a dialog; first digit = class. Class 1 (least severe) FEP 1000–1999 and MCC 1000–1999; Class 2 2000–2999; Class 3 3000–3999; Class 4 listed as 4600 in the operator-manual overview table. PreProcessor text may have no number. Official complete list: C-200MT online help or the C200MT Software User’s Guide. | Class, number, full text — do not guess a 1xxx/2xxx meaning from a forum | Named-dashboard UIs; plotter numeric lists |
| Paragon software | Green / Yellow / Red dashboard plus named vacuum setpoints (Biting, Continuous, Cut, Idle, or Off) and the documented High/Low Error and Low Warning thresholds in the lookup table (Idle is a setpoint in that source; this page does not invent Idle High/Low names). Material Validation Failure can be set to Error, Warn, or Ignore (software v2.0.1 and prior, as documented). A Status Monitor can also alert in yellow or red when a threshold is reached (for example a required tool change). | Exact message or parameter name, color/state, any threshold or vacuum value shown | C-200MT 1xxx–4xxx numbers treated as the same list |
| Other software on listed Stak models (GTXL, XLC7000, Z7, GT5250 / GT7250, Atria GT7; S7200 when present) | Follow what that running software actually shows. Some GT-class software uses Vacuum Low Caution and Vacuum Low Error. This page does not claim that GTXL, Z7, or Atria “run C-200MT.” | Software name + version, full message, nameplate model | A list for a different model, software generation, or plotter |
A shared “Gerber” logo does not mean GTXL, Paragon, and Atria GT7 share the same alarm catalog — or the same blades and bristle. Confirm the model on the Gerber parts identification page.
Plotter caution: Public error lists for sign-and-graphics plotters (for example Gerber enVision or GSx Plus, which use low-integer ROM/RAM or checksum-style messages) are not for apparel automatic cutters. Do not apply them to GTXL, XLC7000, Z7, Paragon, GT5250, GT7250, or Atria GT7.
For official OEM documentation, use the machine’s own help or Lectra’s Gerber support channels, such as the Lectra contact page for Gerber solutions and the Gerber help portal. Stak does not republish OEM manuals.
Named Message Lookup
Answer first: If the wording on your screen matches a row below, use that row. If it does not, do not force a match. Go to the C-200MT class lookup when you have a numbered message, or to the vacuum checks and related parts, knife and sharpening checks, or motion, home, and jam checks if the text points that way.
Only messages and parameter names that could be verified in published Gerber operator or service documentation are listed. No unofficial 1xxx, 2xxx, or 3xxx meanings are invented here.
Jump table: verified named messages
| If you see | Software family | Severity (as documented) | Jump to |
|---|---|---|---|
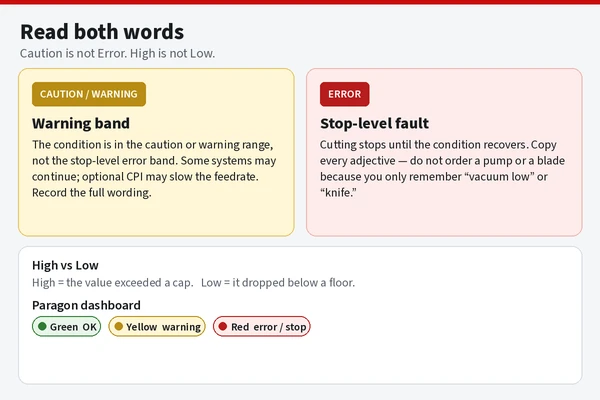
| Vacuum Low Caution | Some GT-class software | Warning; cutting may continue. An optional Cut Path Intelligence (CPI) low-vacuum feature may reduce feedrate. | See Vacuum Low Caution |
| Vacuum Low Error | Some GT-class software | Error; cutting stops until proper vacuum is resumed. | See Vacuum Low Error |
| Biting High Error | Paragon | Alarm if vacuum exceeds the high threshold during biting. | See Paragon vacuum thresholds |
| Biting Low Error | Paragon | Alarm if vacuum drops below the low threshold during biting. | See Paragon vacuum thresholds |
| Continuous High Error | Paragon | Alarm if vacuum exceeds the high threshold in continuous mode (cutting while conveying). | See Paragon vacuum thresholds |
| Continuous Low Error | Paragon | Alarm if vacuum drops below the low threshold in continuous mode. | See Paragon vacuum thresholds |
| Continuous Low Warning | Paragon | Warning (indicator turns yellow) if vacuum drops below this value, which sits above the Continuous Low Error value. | See Paragon vacuum thresholds |
| Cut Low Error | Paragon | Alarm if vacuum drops below the low threshold in cut mode (cutting, not conveying). | See Paragon vacuum thresholds |
| Cut Low Warning | Paragon | Warning (indicator turns yellow) if vacuum drops below this value, which sits above the Cut Low Error value. | See Paragon vacuum thresholds |
| Material Validation Failure (Error / Warning / Ignore on mismatch) | Paragon (documented for v2.0.1 and prior) | Job/material-library mismatch — not a vacuum leak. | See Material Validation Failure |
| Dashboard green / yellow / red, or Status Monitor yellow / red | Paragon | Green = normal (or complete); yellow = possible problem, warning, or a monitor approaching a threshold; red = an error or a threshold reached. | See Paragon dashboard and Status Monitor |
| Numbered message 1xxx–3xxx or 4600, or unnumbered PreProcessor text | C-200MT | Class is the first digit; official wording is in on-machine help. | C-200MT lookup |
Vacuum Low Caution
| How it appears | Message text Vacuum Low Caution on some GT-class GERBERcutter software. Treat it as a warning, not as a stop, unless your screen also shows an error. |
| Common trigger | Table vacuum is at the configured caution level — documented as “dangerously low,” but still in the caution band rather than the error band. |
| Systems / parts that may be involved | Hold-down path: bristle surface, table or zone seals, cover film, material porosity, filters or ports, vacuum zoning / level settings. The vacuum generator is part of the path, but it is not the default first replacement. |
| First checks (after lockout for any inspection) | Confirm it is Caution, not Error. Note ply count, material, and whether zoning or a low-vacuum CPI setting is in use. Inspect the stack seal, flattened or damaged bristle, leaking seals, and accessible filters. Compare the current job with the last good cut. |
| When replacement is reasonable | RFQ bristle, seals, or a loaded filter element when the part is visibly worn, damaged, or no longer sealing. Do not replace the pump on a Caution message alone. |
Vacuum Low Error
| How it appears | Message text Vacuum Low Error on some GT-class GERBERcutter software. |
| Common trigger | Vacuum is too low for cutting. As documented, this message causes the cutter to stop cutting until proper vacuum is resumed. |
| Systems / parts that may be involved | Same hold-down path as Caution: bristle, seals, film, porous material, filters, zoning or level settings, and only later the generator if the mechanical path is sound. |
| First checks (after lockout) | Confirm the exact adjective (Error, not Caution). Restore or diagnose hold-down before blaming the pump: bed seal, bristle condition, zone seals, film, filters, and whether the material or ply count changed. |
| When replacement is reasonable | Same as Caution: replace worn sealing or filter parts when the evidence is on the part. A Vacuum Low Error does not automatically mean “replace the pump.” Replace a generator only when the OEM procedure and the physical evidence support it. |
Paragon vacuum thresholds
Paragon GERBERcutter software sets vacuum with named presets — Biting, Continuous, Cut, Idle, or Off — and compares live vacuum with documented error and warning parameters. Idle is documented as a setpoint (the vacuum used when the cutter is idle). The threshold names verified in Paragon Documentation v1.5 are the High/Low Error and Low Warning rows in the jump table. This article does not invent additional Idle High/Low or Cut High names that were not in that list.
| How they appear | Named parameter or alarm text such as Biting High Error, Biting Low Error, Continuous High Error, Continuous Low Error, Continuous Low Warning, Cut Low Error, or Cut Low Warning, usually with a yellow or red dashboard state. Write the mode (Biting, Continuous, Cut) and High vs Low exactly. |
| Common triggers (as documented) | High Error: vacuum exceeds the high value in that mode. Low Error: vacuum drops below the low value in that mode. Low Warning: vacuum drops below a warning value that sits above the corresponding Low Error value; the indicator turns yellow. The documentation also defines Error Reset Time and high/low latch times as software timing used to limit false errors — a brief dip may not be the same as a latched fault. |
| Systems / parts that may be involved | Hold-down path (bristle, seals, film, filters, porous or leaky stacks), the mode the machine was in (bite, cut, or cut-while-conveying), and the threshold values themselves. |
| First checks (after lockout for inspection) | 1) Read the mode and High vs Low — a High Error is not a leak by default. 2) Note the displayed vacuum and, if you can see them, the threshold values. 3) For Low warnings or errors, inspect seal, bristle, film, and filters, and compare ply/material with the last good job. 4) For High errors, check whether a setpoint or threshold was changed, and do not start by tearing down the bed as if it were a leak. 5) Do not treat a yellow Low Warning as if it were already a stop-level Low Error. |
| When replacement is reasonable | RFQ visible wear in the sealing path (bristle, seals, filter elements) when Low warnings or errors repeat after process checks. Do not RFQ a pump, board, or “vacuum motor” from the message name alone. High Error repeating after a parameter change may be a setup issue, not a consumable. |
Material Validation Failure
| How it appears | A material specified in the job file does not match a material configured on the system. In Paragon software (documented for version 2.0.1 and prior), the setting Material Validation Failure can be Error on Mismatch (error; the job is not cut and is removed from the queue), Warning on Mismatch (warning; the operator may select or create a material and continue), or Ignore Mismatch (no warning or error; the operator may still select or create a material and continue). Version 2.0.2 and above can bypass material selection if that option is configured. |
| Common trigger | Job-file material name does not exist in the cutter’s material library — a data/configuration mismatch, not a hole in the bristle bed. |
| Systems / parts that may be involved | Material library and job file. Not a wear-part alarm. |
| First checks | Read whether the screen shows an error or a warning. Confirm the material name in the job against the names configured on the machine. Have a privileged user select or create the correct material, or change the Processing Settings option only if your plant procedure allows it. Do not start a vacuum teardown. |
| When replacement is reasonable | It is not. Do not order bristle, seals, or blades for this message. |
Paragon dashboard and Status Monitor
| How they appear | The dashboard is color coded: Green = normal operation; Yellow = possible problem or warning; Red = an error or condition requires attention. Separately, the Status Monitor subsystem notifies the operator when a condition needs attention. Monitors are viewed from the Utility Drawer (View System Monitor). A monitor is normally green; yellow or red means it is approaching or has reached a pre-determined threshold. Documentation also states that the Status Monitor can alert that a tool change is required, and that tool wear is tracked (including a Tool Wear % value). |
| Common trigger | A process warning or error (including the vacuum thresholds above), or a monitor threshold such as tool wear / tool change. |
| Systems / parts that may be involved | Whatever the named message or monitor identifies. Tool-wear / tool-change alerts point at the knife or other active tool, not at the vacuum pump. |
| First checks | Record the color and the named message or monitor. Do not translate a yellow dashboard into a C-200MT class number. If the alert is a required tool change or tool wear, inspect the blade (and sharpening consumable) after lockout rather than the bed seals. |
| When replacement is reasonable | When a tool-wear or tool-change monitor is backed by a worn, chipped, or out-of-spec blade or abrasive — identify the part, then RFQ. A color alone is not a SKU. |
How to Look Up a C-200MT Number
Answer first: If your screen shows a numbered C-200MT message, the official meaning is in that machine’s C-200MT online help (or the C200MT Software User’s Guide). This page will not invent a 1xxx, 2xxx, or 3xxx definition to look complete.
The class system below is taken from published C-200MT operator documentation (the same class overview appears in older GERBERcutter manuals, including the S-91 Operator and Maintenance Manual). S-91 is not a coverage model in this article; the table describes the software family, not a claim that GTXL, Z7, or Atria run C-200MT. Always go by the software name on your screen.
| Error message type (as listed) | Number range | What is verified | What this page will not do |
|---|---|---|---|
| Class 1 FEP | 1000–1999 | First digit = class; Class 1 is the least severe. Messages appear in a dialog and are numbered for reference. | Invent the meaning of a specific 1xxx code |
| Class 1 MCC | 1000–1999 | Same class and range as Class 1 FEP; recorded as a separate type in the overview table. | Invent an MCC-only code list |
| Class 2 | 2000–2999 | Class range only. | Invent 2xxx meanings |
| Class 3 | 3000–3999 | Class range only. | Invent 3xxx meanings |
| Class 4 | Listed as 4600 in the overview table | The table lists 4600; this page does not interpret that number or claim a full 4xxx series. | Invent what “4600” means |
| PreProcessor messages | No error number | Record the full unnumbered text. | Treat them as a missing 1xxx |
How to decode the number in front of you
- Confirm the running software is actually C-200MT (header or About). If it is not, do not use this class table.
- Open C-200MT online help or the C200MT Software User’s Guide on that system and look up the exact number and full text.
- Photograph the help entry together with the dialog if you will RFQ a part or call service.
- If the official text points at hold-down, cutting, or motion, use the mechanical checks in the family sections below.
- Never “translate” a Paragon name into a C-200MT number, and never use an enVision / GSx Plus plotter list to fill a gap.
Vacuum Checks and Related Parts
Answer first: A vacuum alarm is a hold-down problem until proven otherwise. Check sealing and the table surface before you assume the pump is finished.
Use the named message first: Caution versus Error, or Paragon’s mode plus High versus Low. Then inspect the path the air actually travels.
After lockout:
- Look at the spread: cover film, edges, folds, and whether the material is more porous than the last good job.
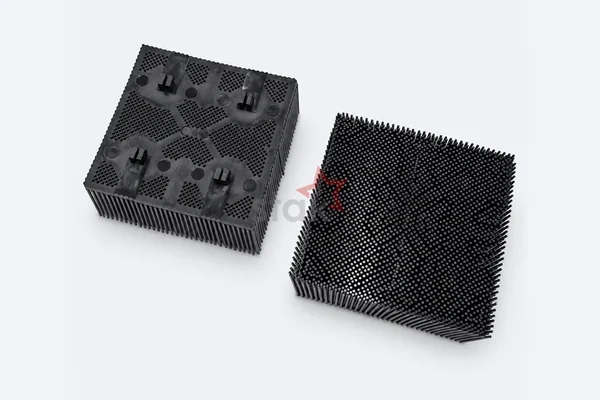
- Look at the bed: flattened, broken, or missing bristle; gaps between blocks; obvious damage in the cut area.
- Look at seals you can reach without defeating a guard: table, zone, or side seals that are torn, flattened, or out of place.
- Check accessible filters or ports per the OEM operator guidance — clean first; replace the element only when it is clearly loaded or damaged.
- Compare settings and job context: ply count, vacuum preset (Biting / Continuous / Cut / Idle on Paragon), zoning, and whether a threshold was recently tightened.
Shop-floor judgment (not an OEM rule): a single yellow Low Warning after a known leaky spread is often a process issue. The same Low Error on every bite, after you have already sealed the stack, is when worn bristle or seals become the likely cause.
Identify a worn block or seal by reference and model. Start with the bristle blocks category and Identify Gerber cutter parts. RFQ Stak with the message, nameplate model, and footprint or seal photos, including any molded codes. A listing such as bristle block 1011273000 / 86875001 is a catalog example of dual Gerber references — not a default answer to every vacuum alarm. Confirm the base on your bed.
Knife and Sharpening Checks
Answer first: If the stop, the Status Monitor, or the quality collapse showed up around cutting or grinding, inspect the knife system — blade, abrasive, and mechanical guides — before you rewrite the nest or invent a numeric “knife error” from another machine’s list.
Paragon documentation describes Knife Intelligence as a real-time compensation for side forces on the blade, and names operator or technician steps such as Null Knife Intelligence and KI Calibration. Those are setup and calibration tools, not a license to invent a “KI error code.” Do not use this article as a calibration procedure.
| What you notice | Check first (after lockout) | Check next | Parts to inspect / identify |
|---|---|---|---|
| Status Monitor or workflow asks for a tool change; Tool Wear % is high | Inspect the blade in the head: chips, rounded tip, heat marks, wrong L × W × T | Sharpening history and abrasive condition | Cutting blade; confirm the model before you RFQ |
| Edges go fuzzy, stepped, or out of tolerance after normal cutting | Blade condition and whether it is the correct reference for this head | Sharpening cycle and knife depth into the bristle | Blade; stone or wheel; bristle if the bed is bald |
| Quality collapses again a few nests after a grind | Stone or wheel: glaze, loaded swarf, worn diameter, wrong abrasive | Arm seating, return springs, grind settings as the OEM manual specifies | Sharpening stone / wheel / belt — match the assembly, not the blade number alone |
| Uneven grind or the knife pulls to one side | Abrasive seating and wear pattern; blade clamp / holder | Bent blade from a prior crash; guide or support play | Holder / guides; replacement blade if bent |
| Grind noise, smell, or an incomplete sharpening cycle | Cracked stone, debris in the head, obvious mechanical binding | If the fault looks electrical or drive-related, stop | Abrasives and obvious mechanical wear only; no electrical DIY |
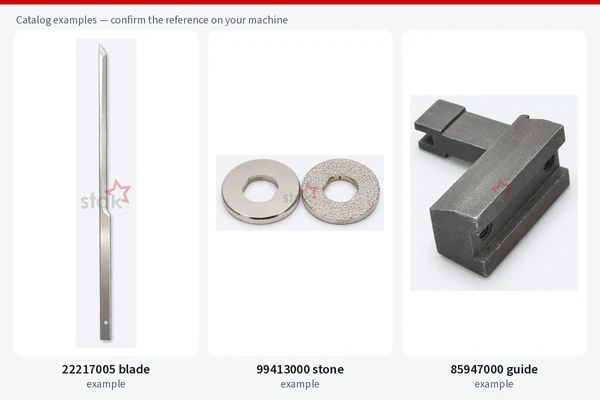
Blade references are model-specific. A GT7250 / S7200 listing such as Gerber cutting blade 22217005 is not interchangeable with a Paragon or GTXL blade of similar length. Identify the stamp, measure L × W × T and the fixing end, and confirm the model on How to Find Your Automatic Cutter Part Number. Catalog examples of sharpening consumables include grinding stone 99413000 and sharpener knife guide 85947000; more items are listed in the grinding parts category — still match the assembly with photos. Stak can quote compatible blades and sharpening consumables from that evidence, but will not invent a stone part number from the blade alone.
Motion, Home, and Jam Checks
Answer first: Clear a safe, visible obstruction first. Then look at mechanical play in guides, bearings, bushings, and belts. If the alarm still reads like a servo, drive, or controller fault, hand it to OEM service.
Paragon’s documented “Prepare Cutter” sequence includes clearing emergency stops if required, completing calibrations, enabling servos, and Home. An E-stop is not a wear-part code: pressing an E-stop cuts power to the servo motors. Recovery follows the OEM procedure (release the button, re-enable servos, then continue as the software instructs). Do not treat an E-stop recovery as a bristle or blade RFQ.
Paragon documentation also refers to off-table errors that can occur when conveyor moves drift uncut sections beyond the usable table area. If your screen mentions an off-table condition, treat it first as a nest, origin, buffer, or conveyor-setup issue — not as a default consumable swap.
Start with what you can see without defeating a guard: fabric, film, a tool, or a cut part blocking the beam, knife, or conveyor; after lockout, debris on rails, belt damage, or a jumped tooth; play in guides, bearings, or bushings; or a fault that appeared right after a crash.
If the mechanical path looks sound and the message points at axis following, servo, or control logic, do not swap boards or add temporary wiring. Capture the screen, software version, and nameplate, and call a qualified technician. OEM documentation may name utilities or calibrations such as KI Calibration, Manual Yaw Alignment (documented as the same idea as C home to System Zero), Heel-to-Heel, Beam Square, Knife Offset, Motor Home Test, and step-size calibrations. Those are tools for trained technicians using the OEM procedure — not steps this article will walk through, and not a Stak electrical parts list.
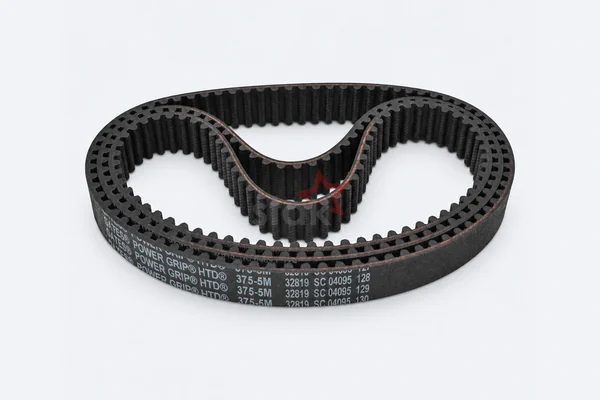
Bearings, bushings, belts, rollers, and guides can be quoted as compatible parts when you send ID × OD × width or a scaled photo plus the Gerber model. A catalog example is Gerber knife-drive timing belt 180500077. See the fault-to-assembly map on Identify Gerber cutter parts.
What the Stop Means for the Cut Pieces
Answer first: A cleared alarm is not proof that the interrupted marker, spread, or hide is usable. Account for every piece whose cut status you cannot confirm.
Before you release the work to sewing or the next process:
- Identify which pieces were fully cut, which were only partly cut, and which were not cut.
- Inspect affected pieces for incomplete edges, a shifted cut, or layer movement.
- On multi-ply work, check the affected plies individually when the stop could have changed registration or hold-down.
- Follow your plant’s quality and traceability process for any piece whose cut status is uncertain.
The risk depends on where the cutter stopped, the material, the spread or hide, and the fault itself. Restarting the machine successfully does not, by itself, release the work.
Easily Confused Alarms, Repeats, and Misdiagnosis
Answer first: The most expensive mistakes are mixing two similar messages, clearing a repeat alarm without looking for a root cause, and buying the wrong class of part.
| Easy to confuse | Why it matters | What to do |
|---|---|---|
| Vacuum Low Caution vs Vacuum Low Error | Caution is a warning; some systems may continue, and optional CPI may slow the feedrate. Error stops cutting until vacuum recovers. | Copy both words. Do not order a pump because you only remember “vacuum low.” |
| Paragon Low Warning (yellow) vs Low Error | The warning threshold sits above the error threshold. Yellow is not yet a stop-level error. | Record color and the full parameter name. |
| Paragon High Error vs Low Error | High means vacuum exceeded a cap; Low means it dropped below a floor. | A High Error is not a default leak. A Low Error is not a default “too much vacuum.” |
| Material Validation Failure vs any vacuum or knife alarm | This is a job-file / material-library mismatch. | Fix the material selection or library. Do not tear down the bed. |
| C-200MT 1xxx–3xxx vs Paragon named alarms vs plotter low integers | Three different products and software families. | Use the software name on the screen. Never apply enVision / GSx Plus lists to an apparel cutter. |
| E-stop or failed Home vs a wear-part alarm | E-stop and homing are safety / motion-state events. | Follow OEM recovery and mechanical obstruction checks. Do not RFQ bristle from an E-stop. |
| Status Monitor tool change / tool wear vs a vacuum color on the dashboard | One points at the knife system; the other may be hold-down. | Read the named monitor or message, not only the color. |
If the same alarm repeats
Do not only clear and restart. A repeated reset can clear a symptom without showing why it returned.
- Compare this occurrence with the last good job (material, ply, speed, vacuum preset). Check whether a threshold, material file, or sharpening interval was changed.
- Check whether the fault follows one cut file, marker, or setup. If it appears only with that job, have the data and setup checked before you change hardware.
- Note whether it returns during homing, a particular axis move, drilling, knife operation, biting, conveying, or grinding.
- Inspect the same wear item you checked last time — a filter cleaned once will load again; flattened bristle will not “recover” after a reset.
- If the official help text points at a drive, encoder, or controller, or the fault persists after the mechanical checks, stop the parts loop. Escalate with the model and serial number, software version, the full message, job conditions, and the checks already completed, and call qualified service.
Common misdiagnosis
- Treating every vacuum message as a failed pump.
- Replacing a sensor, motor, or drive because its name appears in the message. The message names a condition or area; it does not, by itself, prove that component has failed.
- Choosing a blade by length alone (a GT7250 blade is not a Paragon or GTXL blade).
- Filling a missing C-200MT number from a plotter forum or from an unsourced “complete list.”
- Clearing the screen before photographing it, then guessing the wording later.
- Assuming a successful reset means the fault is fixed. If the same message returns, keep the evidence and look for the root cause.
- Releasing the whole marker after a mid-cut stop without accounting for pieces whose cut status is uncertain.
- Starting a mechanical teardown for Material Validation Failure.
Why the Alarm Is Not a Part Number
Answer first: The alarm tells you a condition. The replacement still needs a part number and a nameplate model.
A Vacuum Low Error does not name a bristle SKU. A tool-change monitor does not choose between two blades that share a length. Gerber wear parts often carry current and legacy references on the same item; send both, and do not drop leading zeros or suffix letters. If the stamp is worn, photograph the part with a ruler and add the nameplate (How to Find Your Automatic Cutter Part Number, Stak FAQ). GTXL, Paragon HX/VX, and Atria GT7 must be checked against the individual listing.
Related Parts and Pages
Use these live pages to move from a looked-up alarm to a confirmed mechanical or consumable item:
- Gerber compatible spare parts — start an RFQ by model family.
- Identify Gerber cutter parts — nameplate models and fault-to-assembly map.
- Bristle blocks — vacuum / hold-down surface wear.
- Grinding parts — sharpening consumables; match the assembly, not the blade number alone.
- How to Find Your Automatic Cutter Part Number — how to read stamps and dual references.
- Stak FAQ — compatibility, quality, and order policy.
- Examples only (not default answers to a specific alarm): Gerber bristle block 1011273000 / 86875001, Gerber cutting blade 22217005, grinding stone 99413000, sharpener knife guide 85947000, knife-drive timing belt 180500077.
- About Stak and Contact.
RFQ Checklist
Answer first: Send the alarm record + model + part evidence. That package is enough for Stak to confirm a compatible mechanical or consumable item — or to tell you the fault still looks like an OEM-service issue.
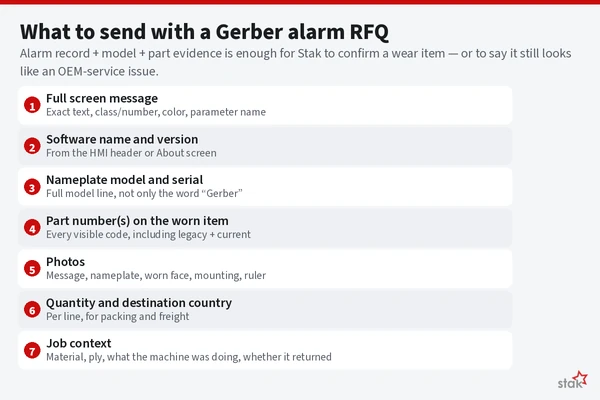
| Field | What to include | Why it matters |
|---|---|---|
| 1. Full screen message | Exact text, class/number if any, color/state, parameter name | Avoids mixing a Caution with an Error, or a Paragon name with a C-200MT number |
| 2. Software name and version | From the HMI header or About screen | Error systems are software-specific |
| 3. Nameplate model and serial | GTXL, XLC7000, Z7, Paragon HX or VX, GT5250, GT7250, Atria GT7, plus related labels (e.g. S7200) when present; serial if readable | Fitment is by model line, not by the word “Gerber.” The serial helps OEM service and avoids mixing two machines in the same plant |
| 4. Part number(s) on the worn item | Every visible code, including legacy + current | Dual Gerber references are common |
| 5. Photos | Message, nameplate, worn face, mounting/base, ruler for scale | Needed when the stamp is weak or the assembly is model-specific (especially stones) |
| 6. Quantity and destination country | Per line | Packing and freight options |
| 7. Job context (short) | Material, ply count, recent changes; what the machine was doing (homing, biting, cutting, grinding, or conveying); whether the same message returned after recovery | Helps separate a one-job setup issue from wear, and tells service what has already been tried |
Email: sales@stakcutterpart.com · WhatsApp: +86 13524892079
Address: Room B208, Building 6, Rongxing Road 407#, Songjiang, Shanghai
Company: Shanghai Stak Enterprise Co.,Ltd · brand Stak · site icutterpart.com
Policy on wrong-ship, quality faults, and normal wear is on the Stak FAQ. Stak supplies compatible mechanical wear parts and consumables. We are not the machine OEM service organization.
Frequently Asked Questions
Is there a complete list of every Gerber cutter error code in this article?
No. Older C-200MT systems keep the official numbered list in on-machine online help (or the C200MT Software User’s Guide). Paragon and later software use their own named messages. Public web sources do not provide a complete, current numeric encyclopedia that would be safe to republish. This page is a lookup for verified named messages, class ranges, and mechanical checks. Confirm against the help and nameplate on your machine.
I have a 1xxx or 2xxx number that is not in this article. What should I do?
Do not search a plotter list or an unofficial “complete codes” page to fill the gap. Confirm the software is C-200MT, open that system’s online help, and look up the exact number. Then use the vacuum, knife, or motion checks here if the official text points at those systems.
Can I use enVision or GSx Plus plotter codes on my apparel Gerber cutter?
No. Those numeric lists belong to Gerber sign-and-graphics plotters, not to apparel automatic cutters such as GTXL, XLC7000, Z7, Paragon, GT5250, GT7250, or Atria GT7.
What should I do in the first 30 seconds after a Gerber cutter error?
Leave the message visible if it is safe, photograph the full screen (including the software name), write the exact text and any class or number, and record the nameplate model. Mark the last piece you can confirm was cut correctly. Do not clear the alarm first, and do not assume a partly cut marker is complete. Lock out before any inspection.
Does a Vacuum Low Error mean I must replace the vacuum pump?
Not by default. Flattened bristle, leaking seals, porous material, and clogged filters are common mechanical causes. Inspect those first. Replace the pump only when the OEM procedure and the physical evidence support it.
What is the difference between Vacuum Low Caution and Vacuum Low Error?
On some GT-class software, Vacuum Low Caution is a warning (the machine may continue; an optional CPI low-vacuum feature may reduce feedrate). Vacuum Low Error stops cutting until proper vacuum is resumed. Copy both words.
My Paragon shows a green / yellow / red dashboard, not a 1xxx number. Is that still a “Gerber cutter error code”?
Yes, in the practical sense: it is the software’s alarm or warning state. Record the named message and color. Do not translate it into a C-200MT class number unless that number is actually on your screen.
What does a Paragon Cut Low Error or Biting High Error mean for parts?
It names a vacuum threshold in a specific mode. Cut Low Error means vacuum dropped below the cut-mode low threshold; Biting High Error means vacuum exceeded the biting high threshold. For Low messages, inspect the sealing path first. For High messages, do not assume a leak. Neither name is a bristle or pump SKU.
When should I call OEM field service instead of ordering a wear part from Stak?
Call qualified OEM or in-plant service when the message points at drives, safety modules, or controller logic; when lockout cannot be verified; when a crash has damaged structure; or when mechanical checks do not explain the alarm. Use Stak when you have identified a mechanical or consumable wear item and can send the reference or photos. OEM documentation: Lectra’s Gerber support contact.
Does a following error mean the servo motor has failed?
Not by itself. If your screen or the official on-machine help mentions a following error, it describes a motion condition: an axis did not stay within the commanded position limit. After lockout, look for a visible obstruction or mechanical binding first. A persistent fault that still reads like a drive, encoder, or controller problem belongs with qualified service. This page does not invent a numeric following-error code.
Can I restart the cutter after an error?
Follow the recovery procedure for your machine and the message in front of you. A restart may clear some faults. If the same message returns, stop repeating resets, keep the screen record, and investigate or escalate.
Should I replace the part named in the error message?
Only when diagnosis and the physical evidence confirm that component. A message identifies a condition or a system area; it does not, by itself, prove that a particular blade, sensor, motor, or pump has failed.
Are Stak Gerber parts original OEM parts?
No. Most wear parts we list are Stak compatible products matched for dimensions, materials, mounting bases, hole patterns, and function. The name Gerber describes compatibility only. Stak is not affiliated with Gerber. Confirm fit from the part number and nameplate, or send photos — see About Stak and Contact.
Request a Quote, or Keep the Official Manual in the Loop
Use this guide to look up the alarm and inspect wear. Use the machine’s own help and a qualified technician for official message definitions, calibrations, and electrical work. Send Stak the RFQ pack above, or email sales@stakcutterpart.com / WhatsApp +86 13524892079. Address: Room B208, Building 6, Rongxing Road 407#, Songjiang, Shanghai. Company: Shanghai Stak Enterprise Co.,Ltd · Stak · icutterpart.com.
Browse: Gerber spare parts · Identify Gerber cutter parts · Bristle blocks · How to Find Your Automatic Cutter Part Number · Stak FAQ
Compatibility notice
Brand names such as Gerber identify intended fitment only. Stak (Shanghai Stak Enterprise Co.,Ltd) is not affiliated with, endorsed by, or sponsored by Gerber or any other named cutter brand. Confirm the exact part and machine configuration before purchase. This field guide is not a substitute for OEM manuals, and it is not a complete encyclopedia of every numeric code.
Author: Jessie Xiao · Stak (Shanghai Stak Enterprise Co.,Ltd) · Last updated 2026-11-13 (Asia/Shanghai).